Documentation
2. Installation
2.1 Installation
2.2 First Steps
Plugin options
3.1 Overlay
3.2 Per-page list
3.3 Global list
3.4 Manage licenses
3.5 Miscellaneous settings
3.6 Unused Images
1. What Image Source Control does and how it works
Image Source Control (ISC) consists of two significant features:
- Manage and display image copyright information
- Keeping track of where an image is used and identifying unused images
Behind the curtains, ISC indexes the public content and the images they contain. This index is used when the plugin warns about missing sources, creates the global image source list, or shows unused images.
2. Installation
After your purchase, you will find the download link for ISC on the confirmation page and inside your confirmation email. These links are valid for seven days.
As long as your license is valid, you may also log into your account and find the ZIP file linked in the Purchase history table. Click “View Details and Download” and scroll down to the end of the page for the download link.
If you have trouble downloading the files, please see Troubleshooting Installation & Licenses.
2.1 Install ISC
In your WordPress backend, go to Plugins > Add New > Upload Plugin(?). From your hard drive, select the still-zipped plugin file you downloaded in the previous step. After uploading the plugin file, click on “Install Now.”
Make sure that any other versions of Image Source Control are disabled.
After installing click “Activate Plugin” or visit the Plugins overview to activate the plugin.
Activate the license key
Your license key is on the confirmation page or in the confirmation email you receive after your purchase.
Go to Settings > Image Sources(?) > License key and enter the plugin’s license key into the corresponding field. Then click on the “Activate License” button.
Once the license is successfully activated, the license key field will turn uneditable.
Updating the plugin
Please note that a valid and activated license key is required to update Image Source Control.
If you experience any trouble updating the plugin, please see Troubleshooting Installation & Licenses.
2.2 First steps
This is optional, but before you put any work into setting up Image Source Control, we’ll quickly check whether the plugin works as intended. Go to Settings > Image Sources(?) and ensure the necessary modules are enabled. Then, follow the steps below.
Image Sources Module
- Under Per-page list, check the boxes for “Insert below the content.”
- Under Overlay, check the box for “Enable.”
- Skip all other options.
- In Media > Library, select any editorial image that is placed in the main content of a page or post on your site and fill in the relevant “Image Source …” fields.
- Go to the page or post in which you are using the image; you should find the Per-page list injected at the bottom of the page or post and the Overlay above the image; if not, and if you have caching by WordPress plugin or server software enabled, clear the corresponding cache.
- See the Troubleshooting page if you are experiencing any issues.
- Reach out to us if you need further help.
Unused Images
- Go to Media > Unused Images. The list might be pretty long. Don’t be irritated by that for now.
- Start a full index by selecting “All” and running Content Scan and Database Scan.
- Reload the tables
- Go to Media > Library and change to Media Library List View to see a list of all images and their appearance in the Appearance column. If you don’t see the column, enable it under Screen Options at the top right.
Media Trash
- The action to permanently delete media files is either replaced or extended to include the option to move them to the Media Trash first.
- You will find trashed items under Media > Media Trash.
- Here you can either delete them permanently or recover them with a single click.
3. Plugin settings
All relevant settings will be made in Settings > Image Sources(?). Don’t forget to save your changes at the very bottom of the settings page.
Plugin Options
- Modules
Enable the main features you would like to use within ISC - Images Only
When enabled, all plugin functions will only work with image files and ignore other attachments like PDF files.
After changing this option, you might want to run the Scanner.
You will see an option to remove ISC data from non-images whenever you enable this option. - Delete Data On Uninstall
See below
Delete data on uninstall
If you ever consider uninstalling Image Source Control out of frustration, please contact us so we can figure out what went wrong and help you get what you expected from our product in the first place. Or more!
This option deletes settings, image source metadata, and tables generated through ISC for your site. This could be catastrophic for well-kept sites with hundreds or thousands of images. Ergo:
Do not enable this option unless you are one hundred percent absolutely and positively sure that you will never, ever again have use for the display of image sources by Image Source Control.
Image Sources Module
The Image Source module has the following option panels:
- Overlay – show image credits next to or above the image
- Per-page list – list all image sources of a given page
- Global list – list image sources of the whole website on a given page
- Image licenses – enable to link images to license information
- Miscellaneous settings
We generally recommend setting up and including the Global list and combining it with either the Overlay or the Per-page list—limited to one of both methods—if you like.
3.1 Overlay
This option will display the image source as credits as an overlay on individual images.
The credits have the format (Pre-text) (Copyright owner with link) | (License with link).
The overlay should always be combined with either a per-page list or a global list since script and theme conflicts might cause it not to show up without you noticing.
These are the available options when using Overlays.
- Overlay prefix
Decide on which prefix, if any, you’d like to set before the image attribution. Popular choices are the copyright symbol (©) or the terms “Source:” or “Image source:”. - Layout
Choose the overlay’s behavior. If you’re experienced in using HTML and CSS, you may choose to disable all of ISC’s styling for the Overlay element. The source text will then show up below the image. You can then use the isc_overlay_html_source hook to add your own markups and styling.
Here are a few examples:


- Overlay position
Seven options for easy repositioning of the Overlay element in reference to the image. They might differ slightly depending on the theme and Layout option.
ISC offers additional options for the Overlay for experienced users.
Included Images
Which option to select here depends a lot on your specific site, your theme, and whether you have any copyright-protected imagery placed outside of the editorial content—for example, in the navigation bar or sidebars. When in doubt, select “Images on the whole page.” Compare this to the Per-page list option of the same title. This option will also show overlays on archive pages, like post thumbnails on the main blog overview page.
When you have a specific page builder installed, additional options might show up:
- Elementor: Enable this option to show image sources for Elementor background images. Find out more on Elementor image captions. See also Compatibility with Elementor.
- Divi. See also Compatibility with Divi.
Developer options
Experienced users can enable caption overlays also for background images within inline styles or between <style> tags. These options are described in detail in Displaying Image Captions for Background Images.
3.2 Per-page list
These options enable the display of a source list of all images used on the current page or post. You can place the list manually using the shortcode—which we’ll describe later—or have ISC automatically inject it below each page or post.
Here you may also choose whether and how to display image sources on archive pages like the category feed.
For archive pages there are a few caveats to keep in mind:
- Even if your theme doesn’t display post thumbnails on archive pages, the source might still be displayed
- If other parts of your site query the excerpt, the source string might also appear there; see how to address this in the section for experienced users
You can fine-tune the per-page list view using these options.
- Headline (self-explanatory)
- Included images
Which option to select here depends a lot on your specific site, your theme, and whether you have any copyright-protected imagery placed outside of the editorial content—for example in the navigation bar or in sidebars. When in doubt, select the strongest option, “Any image URL”.
ISC offers additional options for the Per-page list for experienced users.
3.3 Global list
The Global list is a list of all images on all pages or posts of your whole website. Hence, it’s usually placed on a dedicated “Image sources” page or relevant existing pages such as “Imprint.”
The Global list is injected manually through shortcode—which we’ll go into shortly.
Choose the Included data in the “Global list.” When you enable thumbnails, you will also have a chance to select their size.
By default, the “Attached to” column lists posts and pages where Image Source Control found images in their main content. Enable the option “Index images outside the content” to index images outside the content. This is limited to 10 posts, which you can change using the isc_image_posts_meta_limit filter.
If an image was dynamically added after ISC indexed the content, you could re-save the page with a minor change so that ISC searches for images again.
ISC offers additional options for the Global list for experienced users.
Please note that the Global list page is not indexed for images. You should not add a licensed image that needs an attribution to the content. Manually added images on this page might also be considered “unused”.
Tip: Run the Scanner to automatically populate the Global list without manually visiting every post.
3.4 Image licenses
ISC allows you to add individual licenses and optional links to the corresponding full license texts which will be available as choosable options when filling out copyright metadata on images.
The license name, linking to the full license text if applicable, will appear in all display varieties next to the copyright owner’s name.
Under “Image licenses” there are two options to consider:
- Enable licenses (self-explanatory)
- List of licenses
This offers an editable list for you to add, modify, or delete licenses. We have supplied a pre-composed list but feel free to go wild. Note that the link to the full license text is optional. Stick to the format(License name)|(optional full URL)and don’t forget to save your changes at the very bottom of the settings page.
3.5 Miscellaneous settings
3.5.1 Standard source
Instead of handling the source of each image manually, you can define a standard source used for a number of images at the same time. This is an excellent option for when more than just a few of your images are licensed from a singular copyright owner or when they’re your own photos.
There are two scenarios in which a standard source can be displayed:
- If the option Use standard source is activated for a given image.
- For all images without a source. Needs to enable the option Show the standard source for all images that don’t have a source.
There are the following options available to fill the standard source:
- Exclude from lists: No image caption will show up.
- Author name: Name of the person who uploaded the image to the media library. Also known as “Author” or “Uploaded by”.
- Custom text: A static text, e.g., your name, if you are the copyright owner of most images.
- IPTC meta data: Some photographers add IPTC metadata with copyright information to their images. This option reads this information and displays it automatically. See more under Displaying IPTC copyright information as an image caption in WordPress.
3.5.2 Block options
The options to manage an image’s source information on a post edit page are either displayed in the media library overlay or in the block options for image-related blocks.
Enable the Block options setting to manage image source information in the block editor. Disable it if you experience problems with that feature or want to manage them in the media library overlay.
Please note:
- Changing image source information for featured images is only possible in the media library overlay.
- Block options only work for WordPress core blocks, not third-party blocks.
3.5.3 Warn about missing sources
Tracking and handling missing source info is one of the key features of Image Source Control. This option will simply enable a warning to be displayed in your backend when ISC’s algorithms track down an image with its source info missing.
3.5.4 Enable the debug log
Here, the debug log function is activated. See the Debug Log section for detailed information on how to use it.
3.6 Unused Images
Database Scan: Search attachment IDs in content
Search attachment IDs in content: Enable this option, and ISC will find image IDs in post content. This can help with page builders that dynamically transform HTML or shortcodes into image tags. E.g., [image id="123"] later become <img src="https://example.com/image.png" class="wp-image-123"/>. Enabling this option can create a lot of false positive entries in the Unused Images list and is not needed for most sites.
Note that the Content Scan finds images embedded like this without a problem, so this option isn’t needed if you run both scan types.
Content Scan: Run as a logged-in user
If you have content visible only to logged-in users, you can enable the option Settings > Image Sources(?) > Unused Images > Content Scanner > Run as a logged-in user. This will use the current admin session to view all posts.
Use this option only if needed, as it requires more resources.
Content Scan: Post content or any image URL (Global images)
By default, the Content Scan looks for images in the post content – the text added by you via the post edit screen in the WordPress dashboard – and the featured image. Especially with page builders and other dynamically added images, it might make sense to enable the option “Any image URL in page HTML” to also find images that are technically not part of the content.
This type of search might slightly increase the time required for the Content Scan.
If the same image appears more than four times with this scan option, only the first four occurrences are listed and considered, and you might see an appropriate label in the Appearance list. Technically, only these occurrences are stored in the internal index. You can change this threshold using a filter.
Details
Enable this option to list details about where exactly an image was found in the Appearances column on Media > Unused Images.
4. Fill in your image sources
Next, we’ll go through where you can fill in the necessary image source data.
4.1 Use the image block
This applies if you have the “Block Options” setting enabled.
When uploading or editing the image using the image block in the block editor, you will find the “Image Source …” fields in the block settings on the right.
Enter specific image source info or treat the image using the “Standard source” option.
4.2 Use the media library
You can also edit the image source in the media library.
- Go to Media > Library
- Click on the image’s thumbnail
- Find the “Image Source …” fields on the right
Enter specific image source info or treat the image using the “Standard source” option.
4.3 Quick and bulk-editing in the media library
You can quickly edit multiple image sources, either individually or in bulk, in the Media Library List View.

- Go to Media > Library
- Switch to list view and apply any filters needed
- Fill in copyright information in the Image Source Form column
- Preview the information in the Image Source column
- Any information entered will be automatically saved; there is no need to press any buttons
Choose either to enter specific image source information or to treat the image using the Use standard option.
If you can’t see the image source columns, flip open the “Screen Options” in the upper right corner and check the appropriate boxes.
Bulk editing
If you want to apply identical image source information to multiple images at once, check the checkbox in the left column and click on the appearing Bulk edit image sources button. A modal will open.
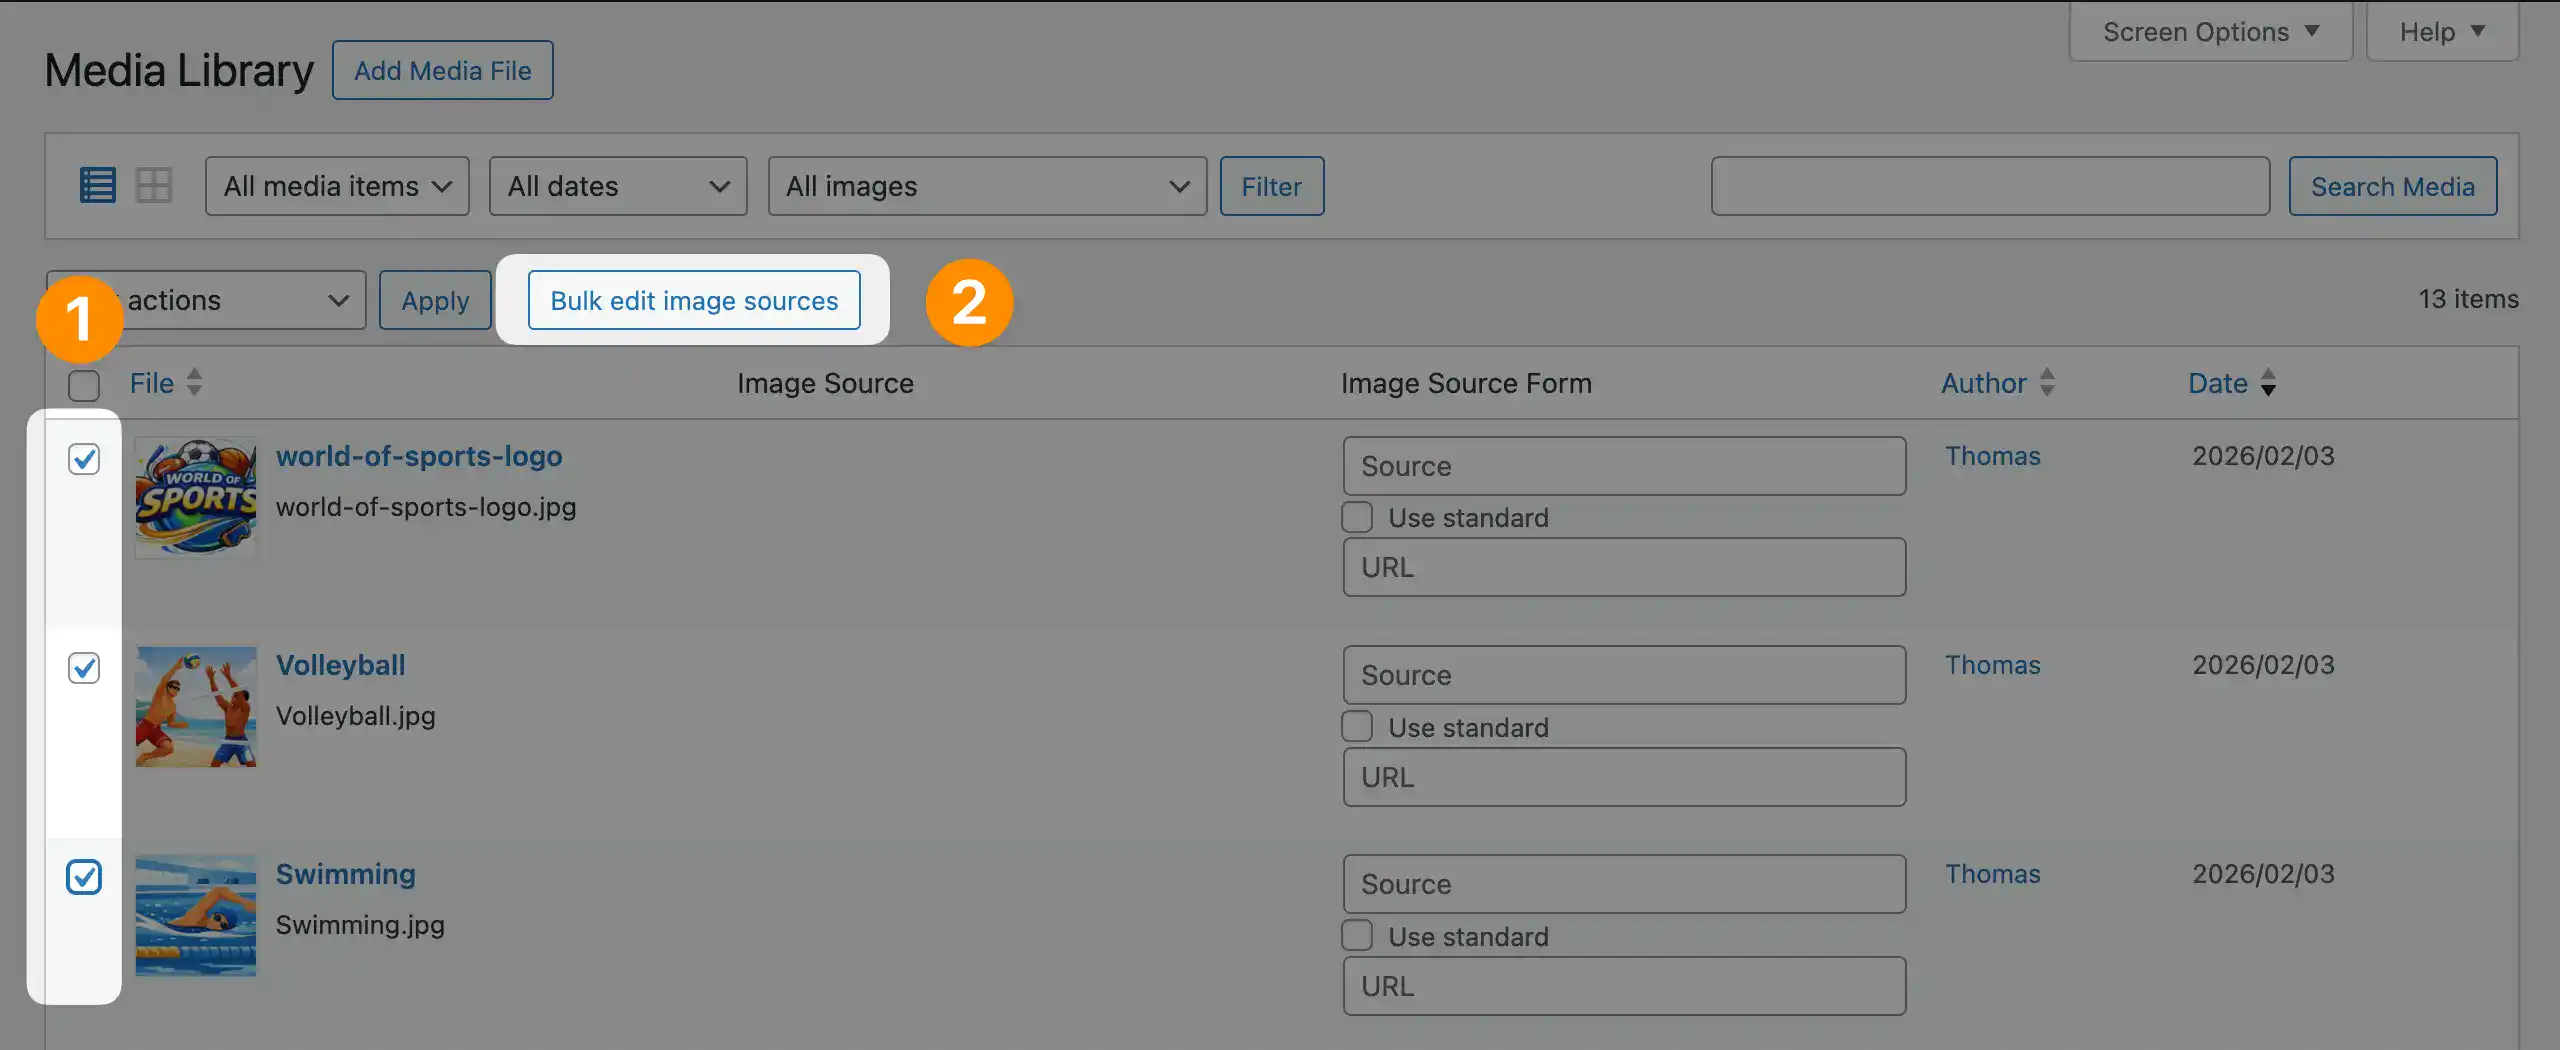
The image source information entered in the modal will be automatically applied to all selected images. Existing information will be overridden or removed.
This function is only available when the Image Source Form column is visible.
4.4 Find images without source information
At the top of the Media Library List View, you can find a filter by the status of the image source, which makes it easy to identify images with missing or entered author information.

4.5 Use multiple links
You can use multiple links in your source string. For this to work, you need to separate the strings in the text field and URLs using commas. An empty URL value would skip one part of the source text.
E.g.,
Source: “Image Source Control, Features, Contact“
URLs: “https://imagesourcecontrol.com, , https://imagesourcecontrol.com/support/“
would become “Image Source Control, Features, Contact”
You can also add a comma at the beginning of the source to leave the first section unlinked or a comma at the end to not link the last section.
The additional URLs will be ignored if there are more comma-separated URLs than comma-separated texts.
5. Shortcodes
This section explains the usage of ISC’s own shortcodes and their parameters.
5.1 Display the Per-page list
To manually place the Per-page list into any page or post, use the shortcode block to place the following shortcode in the specified page or post:
[isc_list]Code language: JSON / JSON with Comments (json)You can list the image sources of a particular page using the id parameter. Replace 123 from the example below with the ID of your page.
[isc_list id="123"]Code language: JSON / JSON with Comments (json)5.2 Display the Global list
To place the Global list that lists all images used on your whole site, either edit an existing static page or create a new one and place the following shortcode in it using the shortcode block:
[isc_list_all]Code language: JSON / JSON with Comments (json)There are several parameters available. Simply append one or more to the shortcode, sticking to the format:
[isc_list_all parameter1="value1" parameter2="value2"]Code language: JSON / JSON with Comments (json)included="(all|included)"
Useincluded="all"to list all images from your media library, including those not actively used in any posts and pages.per_page="(numeric value)"
Useper_page="25"to have ISC list 25 images per page. If there are more, ISC will create additional pages and elements to navigate them.prev_text="(string value)"
Useprev_text="« Previous"to have the corresponding element spell “« Previous” in the page navigation generated by ISCnext_text="(string value)"
Usenext_text="Next »"to have the corresponding element spell “Next »” in the page navigation generated by ISCstyle="(table|list)"
By default, the Global list is displayed as a table. You can setstyle="list"to show it as a simple list. In this case, the columns selected in the options will be separated by `|` and the list will be ordered alphabetically (including HTML meta characters). Pagination is disabled for the list view.
As mentioned, you may append as many parameters as you want. For example:
[isc_list_all included="all" per_page="25"]Code language: JSON / JSON with Comments (json)6. Unused Images
Take a look under Media > Unused Images to find an overview of images that Image Source Control cannot find attached to any page, post, or relevant database entry.
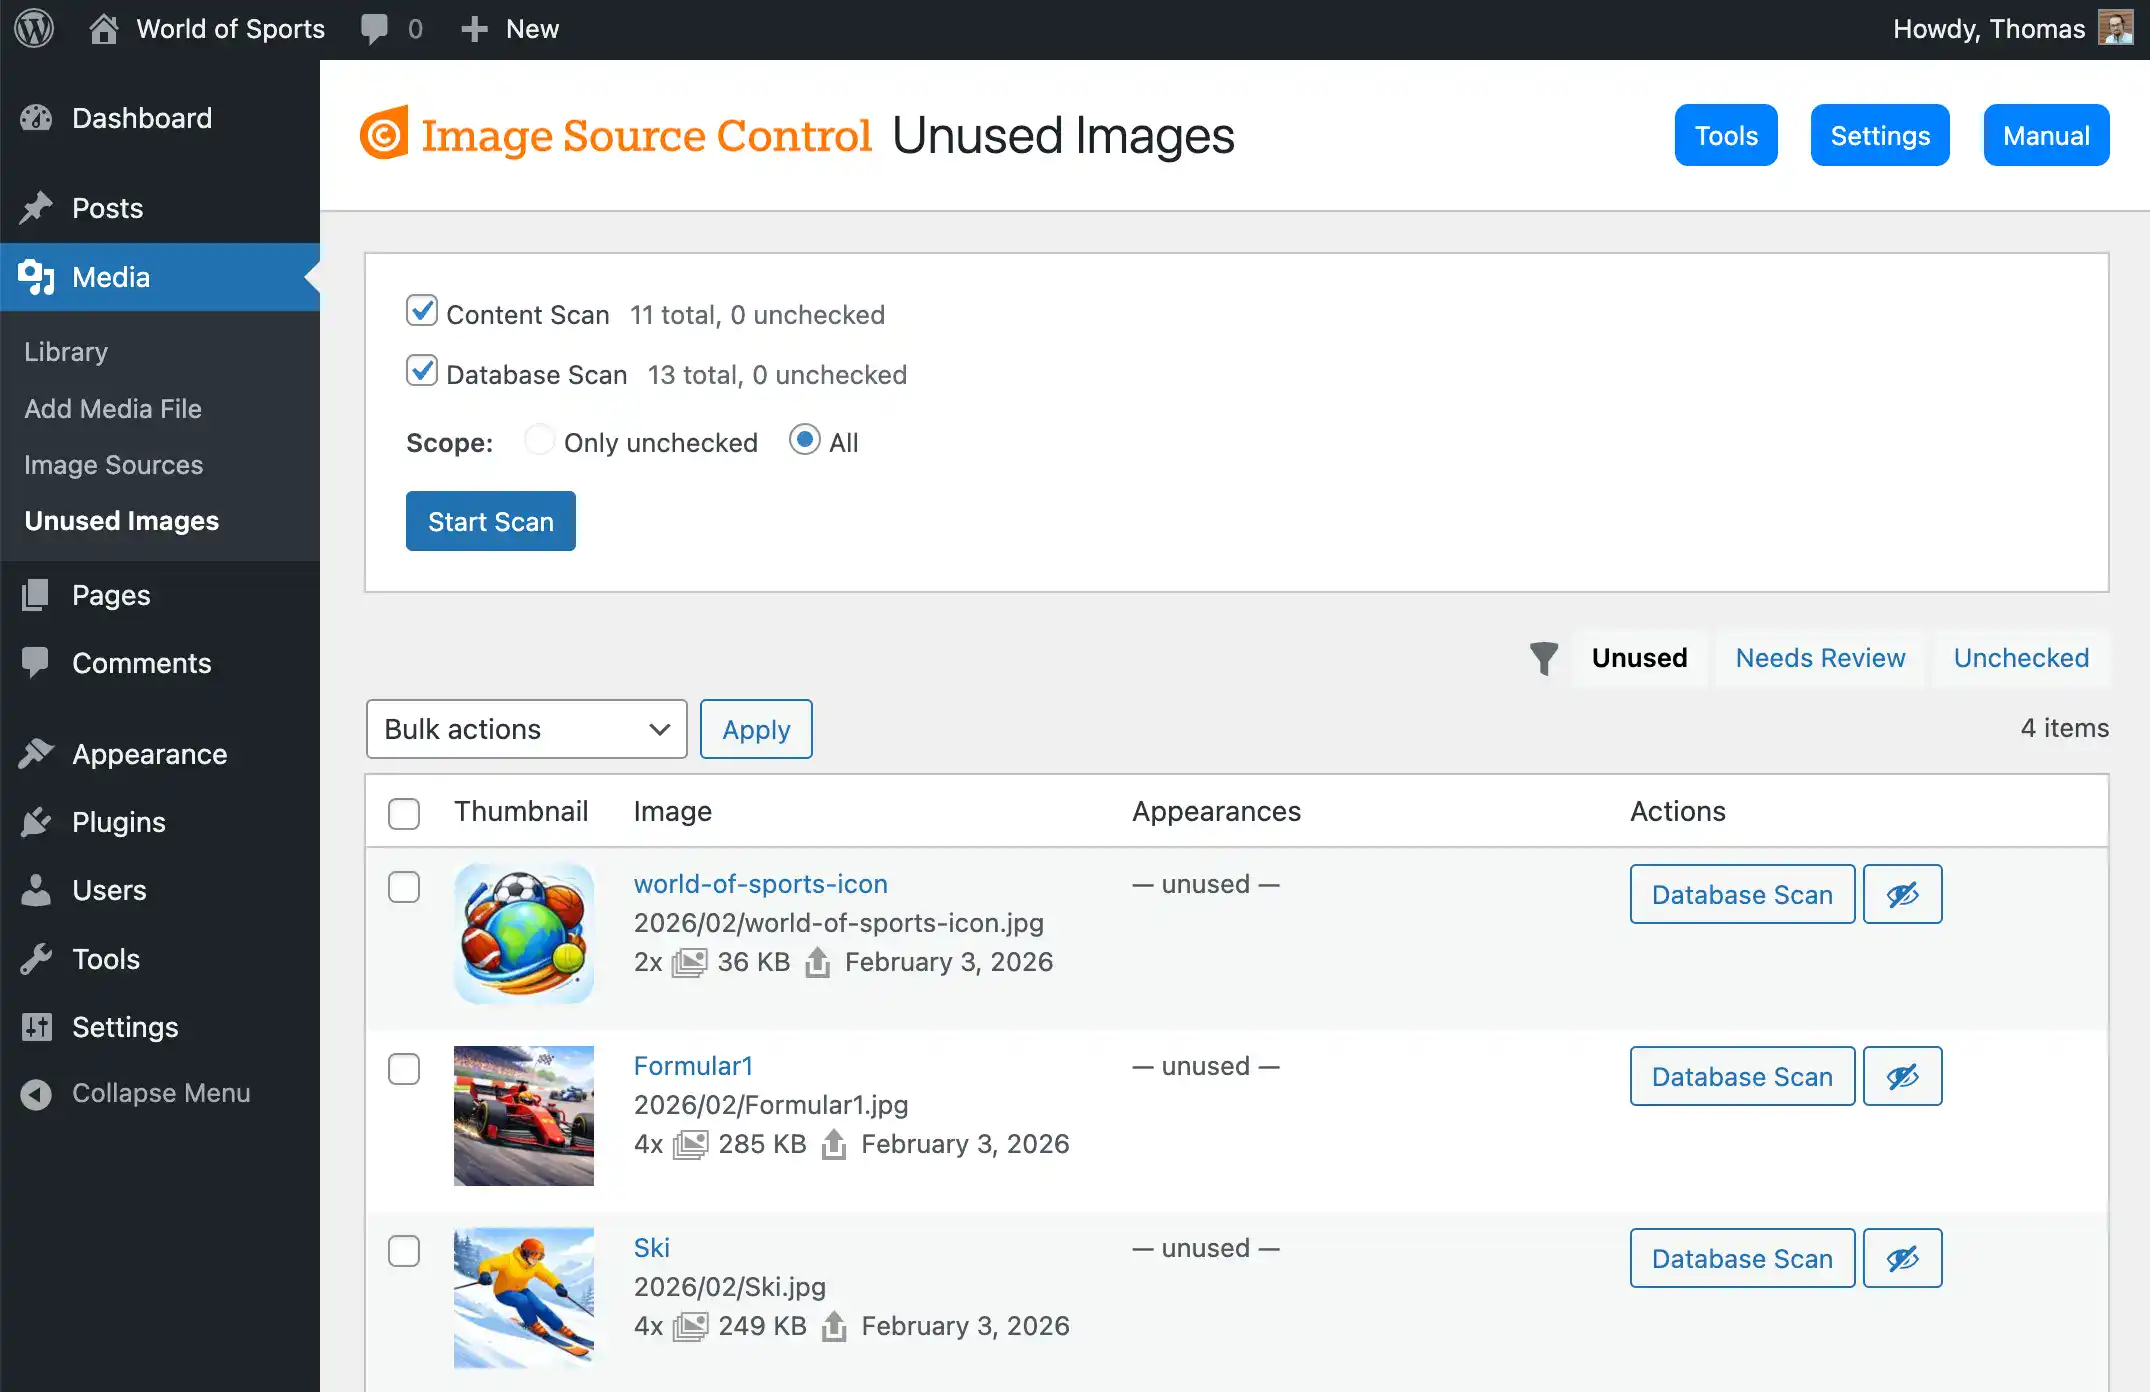
Scanner
The Scanner can automatically look through content in the frontend and the database in preparation to delete unused images.
Find the options related to Unused Images under Settings > Image Sources(?) > Unused Images. See this section in the manual for more details.
Content Scan
The Content Scan simulates a real visitor to your site and then looks at the images displayed to them. It either looks at the featured image and the post content, or the whole generated HTML (see Unused Images Settings).
Whenever you add, update, or delete content, the index is updated the next time that content is visited in the frontend.
Limitations:
- Image URLs dynamically created, e.g., using JavaScript, are not indexed.
- The Content Scan goes through published content. Other post statuses, like drafts, private, or trashed posts, are ignored.
- Ensure your frontend is accessible to all users, regardless of their login status. See “Run as a logged-in user” if your website isn’t publicly accessible to everyone.
- The Scan doesn’t follow redirects. I.e., if a post is redirected to another page, neither the original nor the final page are being indexed.
- Once the Content Scan runs through all posts in one go, index information that predated that run is cleared. This cleanup does not occur when only scanning unchecked content. The latter case could lead to some outdated information.
Database Scan
The Database Scan checks the database for image URLs and IDs to find image usages in meta fields and options.
Limitations:
- There is a chance of false positives when an image ID equals a value in an option. E.g., imagine an option
min_screen_sizewith the value1200. If you had an unused image with the ID 1200, then the option name might pop up as a potential usage for that image. The combination of requirements makes this very rare, though. - Images that only appear in the content of trashed posts are considered “unused”.
Additional notes to the Scanner
- Ideally, let the Scanner finish in one go. However, you can always come back and continue indexing unchecked entries.
- Featured images are always considered “used,” even though it is possible that your current theme does not display them. If you are unsure about a specific image, check the Appearances list in that image’s media details.
- The pagination of the list of unused images is built incrementally. I.e., it starts looking for the first 100 unused images starting with the lowest attachment IDs. You can navigate to page 2 of the list to see the next 100 images. From here, you can navigate to page 3, etc. ISC remembers the total number of pages you have already visited.
Media Library: Appearance column
When using the Unused Images module, you will find the “Appearance” column in the list view of the Media Library. It lists for any image, where ISC found it.
You can show or hide the column in the Screen Options in the top-right corner of the screen.

7. For experienced users
The information in this section is meant for developers who want to learn how Image Source Control works under the hood. It also contains examples for customizations.
Also, for users fairly fluent in the PHP scripting language, ISC offers several ways to further customize the plugin’s output.
7.1 Compatibility
ISC is supposed to work with the PHP versions that WordPress officially supports. If you find issues with official or upcoming PHP releases, please let us know.
ISC supports browsers according to the WordPress Core Browser Support. For example, Internet Explorer up to version 11 is not supported.
See also Compatibility for known issues between WordPress plugins and themes.
7.2 How ISC searches for images
ISC stores image source info as post meta for the attachment. When creating the source list in the frontend, ISC looks for attachment IDs in the frontend code following a few patterns created by WordPress standards.
In addition to that, the plugin also looks for image URLs. If they are missing an attachment ID the plugin tries to identify them based on the URL in the database. It looks for a match in the _wp_attached_file post meta field.
When looking for the original image URL in the database, ISC automatically removes strings only available for images in the frontend, like -scaled, rotated, or other additional classes added by WordPress.
If the image URL is changed in other ways, ISC might not be able to find it.
7.3 Where ISC searches for images
All display options—Overlay, Per-page list, and Global list—offer to include images that are placed on two or three levels of mark-up. Each method also covers the images found on the previous level:
Level 1—Images in the content
Available for Overlay, Per-page list, and Global list.
- any
imgtag in the content - images in the WordPress
galleryblock - images in the WordPress
coverblock
In addition, the Per-page list and the Global list will include featured images.
Level 2—Images on the whole page
Available for Overlay, Per-page list, and Global list.
- any
imgtag within thebodytags - including images in any sidebar
Level 3—Any Image URL
Available for Per-page list and Global list.
- background image—as set in WordPress—that is within the
headtags - image URL in a
dataattribute—for example<div class="e-gallery-image elementor-gallery-item__image" data-thumbnail="https://example.com/wp-content/uploads/2020/07/image.png" data-width="300" data-height="169" alt="…"></div>
7.4 How ISC indexes
ISC creates two types of indexes:
- Post meta values
isc_post_imagesstores the image IDs in the content of public posts. This index is used to build the Per-post list.isc_image_postsstores the IDs of posts in which an image appears. This index is used to build the Global list.
- The table
isc_indexstores image-post relations for the Unused Images feature
Indexes are created when a post was visited for the first time or after it was updated.
When the post is visited for a second time, the index is not created again but taken from the stored value.
Indexing behavior can best be examined when using the full source list:
[isc_list_all]only shows images that are associated with a post already, i. e. indexed; you can see it growing with any new images indexed[isc_list_all included="all"]shows all images from the media library; the column for associated posts is empty when the index is not (yet) filled
Since the Global list is built from isc_image_posts, it will contain the information for posts that have been updated but not yet re-indexed by visiting it in the frontend. That data is updated as soon as the post is visited again.
Additional notes on indexing
Only images that are technically added to the content with a priority of lower than 20 for the_content are taken into account.
Indexing only works on single pages, not on archives. This decision was made to prevent cases in which some content on archive pages might be different from the original single page.
7.5 Display functions
Ideally, Image Source Control options are sufficient to insert image captions to your liking. In rare cases, you might want to use one of the public functions below to show an individual or list of image sources.
isc_list
Instead of using the shortcode [isc_list] you may place the Per-page list with the PHP function isc_list()—for example:
<?php
	if ( function_exists( 'isc_list' ) ) {
		isc_list();
	}
?>Code language: HTML, XML (xml)
isc_image_source
In order to list a singular image source in your frontend or in your template, use the function isc_image_source and hand over the image’s ID as noted in the media library as parameter $att_id—for example:
<?php
	if ( function_exists( 'isc_image_source' ) ) {
		isc_image_source( $att_id );
	}
?>Code language: HTML, XML (xml)
isc_thumbnail_source
In order to list the image source of the featured image or thumbnail of a post in your template—single page or archive pages within the loop—use the function isc_thumbnail_source and hand over the post’s ID as parameter $post_id—for example:
<?php
	if ( function_exists( 'isc_thumbnail_source' ) ) {
		isc_thumbnail_source( $post_id );
	}
?>Code language: HTML, XML (xml)
This is the recommended way to prevent other parts of your site from querying the excerpt and having the source string appear there—as described in section Per-page list.
7.6 Code Snippets & Customization
See also Customizations and find more solutions in the following posts:
- Adding overlays to images with dynamic URLs
- Changing Plugin-generated Texts in the Frontend
- Displaying Image Captions for Background Images
- How to Automatically Delete Images in WordPress After a Time Period
- How to migrate from Credit Tracker to Image Source Control
- How to perform a reverse Google Image Search from your WordPress Media Library
- How to show a caption for a background image of the Group block
- How to show image captions for non-standard image tags
- The CSS to overlay text on images in WordPress
8. Troubleshooting
Find detailed troubleshooting information on the dedicated Troubleshooting page.
See also Compatibility.