WordPress Media Trash: How to Enable the Trash Feature for Your Media Library
WordPress deletes media files permanently by default. No trash, no recovery. Learn how to enable the media trash feature to protect yourself from accidental deletions and restore deleted images when needed.
When you delete an image from your WordPress Media Library, it’s gone forever. Unlike posts and pages, WordPress doesn’t send media files to the trash by default; instead, it deletes them immediately.
This can be problematic. I’ve accidentally deleted images that were still in use, only to realize it hours later. Even worse is when a kind visitor eventually points out my mistake. The panic of trying to restore files from an outdated backup isn’t fun.
Fortunately, there’s a simple (but well-hidden) solution: we can enable a trash feature for our WordPress Media Library. This gives us a safety net, allowing us to restore accidentally deleted media files before they’re gone for good.
Why WordPress Doesn’t Have Media Trash by Default
WordPress treats media files differently from posts and pages. When you delete a post, it goes to the trash for 30 days before being permanently deleted. But media files? They’re deleted from your server immediately.
The likely reason is storage management. Media files – primarily images and videos – take up significant server space. WordPress assumes you know what you’re deleting and won’t need a recovery option.
But this assumption doesn’t always hold true, especially when:
- Multiple users manage the same site
- You’re cleaning up a large Media Library and might make mistakes
- You’re testing different images and want to revert changes
- You’re unsure if an image is still in use somewhere on your site
I have a personal story with all of the above, but let’s not keep us from the solution.
How to Enable Media Trash in WordPress
There are two main approaches to enable the trash feature for your WordPress Media Library: using a code snippet or installing a plugin.
Method 1: Enable Media Trash with Code
WordPress actually has a built-in media trash feature. It’s just disabled by default. You can activate it by adding a single line of code to your wp-config.php file.
Step-by-step instructions:
- Connect to your website via FTP or use your hosting provider’s file manager
- Locate the
wp-config.phpfile in your WordPress root directory - Open the file in a text editor
- Add this line before the
/* That's all, stop editing! */comment:
define('MEDIA_TRASH', true);Code language: JavaScript (javascript)- Save the file and upload it back to your server
What happens after enabling this:
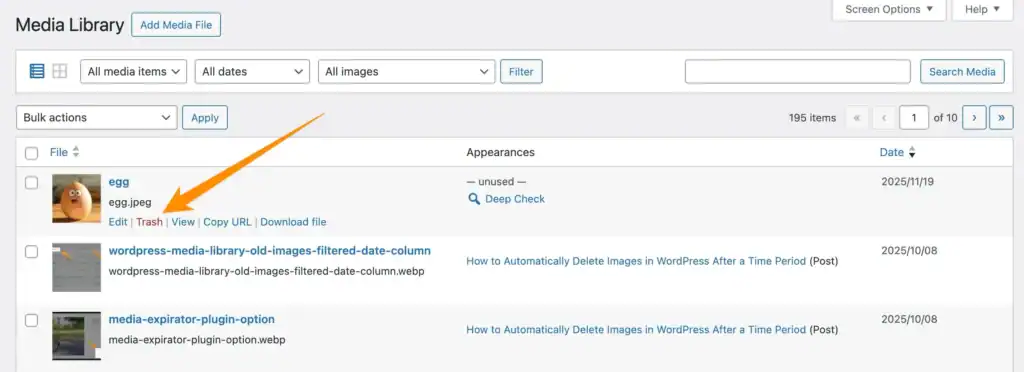
- The “Delete Permanently” link in your Media Library changes to “Trash”
- A new “Trash” filter appears in your Media Library view
- Deleted media files are moved to the trash instead of being permanently deleted
- You can restore files from the trash or permanently delete them later
- The “Trash” is deleted automatically after 30 days
This method is lightweight and doesn’t require any additional plugins. It uses WordPress’s native functionality, which means it’s fast and won’t add any overhead to your site.
Pros:
- No plugin required
- Uses native WordPress functionality
- Lightweight and fast
Cons:
- Requires editing core WordPress files
- No additional features beyond basic trash functionality
- You need to manually empty the trash periodically
- The switch to the Trash view is a bit hidden within the “All media items” filter
Method 2: Use the Media Trash Button Plugin
This method is not an alternative to Method 1, but an addition to it.
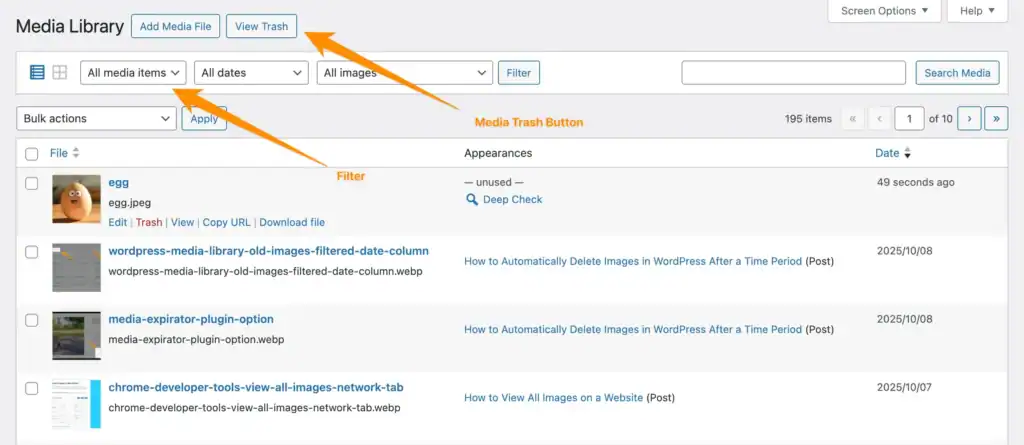
Use the plugin Media Trash Button for faster navigation to the Media Library Trash view.
What the plugin adds:
While you still need to add the MEDIA_TRASH constant from method one above to your wp-config.php file, the plugin enhances the trash functionality with convenient UI improvements:
- Quick-access buttons: Adds “View Trash” and “All media items” buttons directly in the Media Library header for easy navigation between your regular library and trash
- Admin notices: If you forget to add the
MEDIA_TRASHconstant, the plugin displays a helpful warning message with instructions
How to use it:
- Install and activate the Media Trash Button plugin from your WordPress dashboard
- Add the same code line to your
wp-config.phpfile:define('MEDIA_TRASH', true); - The plugin will enhance the trash functionality with additional features
The main advantage of this plugin is convenience. Instead of using the dropdown filter to access your trash, you get prominent buttons that let you switch between your regular library and trash faster – especially useful if you frequently review and restore deleted files.
Pros:
- Quick-access buttons for easier navigation
- Helpful admin notices if setup is incomplete
Cons:
- Still requires the
wp-config.phpedit for the constant - Adds another plugin to your site
- Only works in list view (not grid view)
- No functionality beyond UI convenience
My recommendation: If you regularly work with your Media Library in list view and frequently move files to trash and restore them, the plugin’s quick-access buttons can save you a few clicks. However, if you, like I, only occasionally use the trash feature, the manual code method is sufficient and keeps your plugin count lower.
How to Restore Media Files from Trash
Once you’ve enabled the media trash feature, restoring deleted files is straightforward:
- Go to Media > Library in your WordPress dashboard
- Click the dropdown filter that says “All media items”
- Select Trash
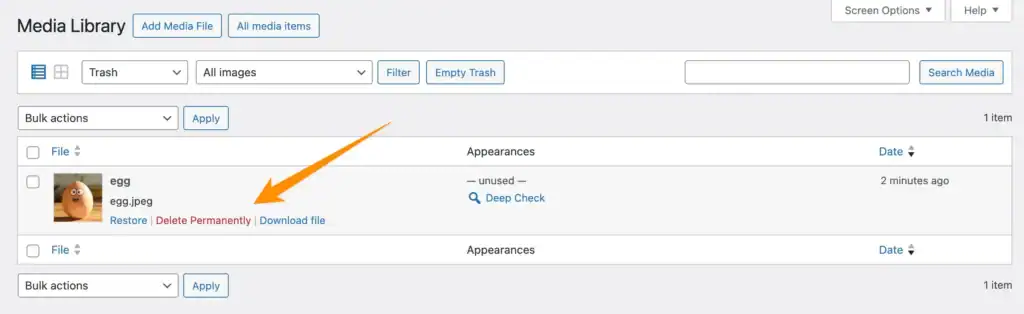
- Find the file you want to restore
- Click Restore to move it back to your Media Library
You can also permanently delete files from the trash by clicking “Delete Permanently” while viewing the trash.
Managing Your Media Library Trash
Just like with posts and pages, WordPress automatically empties the media trash after 30 days by default. This means trashed media files are permanently deleted after this period without any manual intervention required.
Customizing the automatic deletion interval:
If 30 days is too long or too short for your needs, you can customize this interval by adding another constant to your wp-config.php file:
define('EMPTY_TRASH_DAYS', 7);Code language: JavaScript (javascript)Replace 7 with the number of days you prefer. For example:
1for daily deletion7for weekly deletion14for bi-weekly deletion
Disabling automatic deletion:
If you want to keep trashed files indefinitely and delete them manually, set the value to 0:
define('EMPTY_TRASH_DAYS', 0);Code language: JavaScript (javascript)Important: Setting this to 0 disables the auto-delete feature entirely. This setting applies to posts and pages! You now always have to empty the trash manually.
Best practices for managing media trash:
- Keep the default 30 days: For most sites, the default 30-day interval provides a good balance between safety and storage management.
- Review before automatic deletion: If you have important files in trash, make sure to restore them before the 30-day period expires.
- Consider shorter intervals for large sites: If you manage thousands of media files, a shorter interval like 7 or 14 days can help keep your server storage under control.
- Monitor your trash regularly: Even with automatic deletion, it’s good practice to check your trash monthly to ensure nothing important is about to be permanently deleted.
In my experience managing large websites with sometimes thousands of images, I keep the default 30-day setting, but make it a habit to review the trash once in a while. This gives me peace of mind that nothing important will be automatically deleted while still maintaining automatic cleanup.
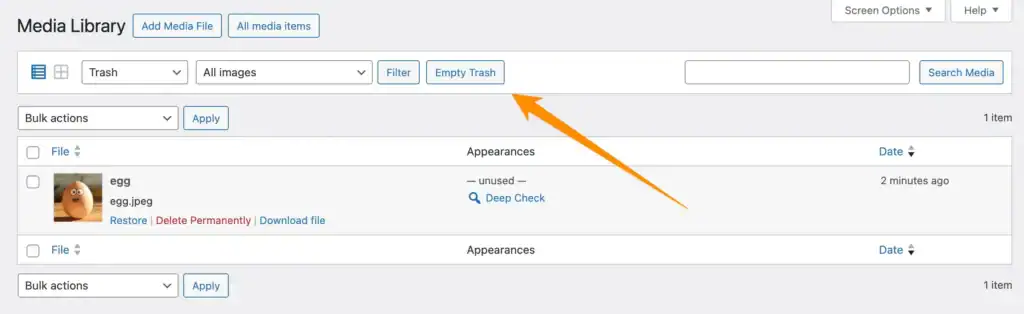
By the way, you can also empty the whole trash with a single click.
When Media Trash Isn’t Enough: Finding Unused Images
While the media trash feature protects you from accidental deletions, it doesn’t help you identify which images are safe to delete in the first place.
This is where a more comprehensive solution becomes valuable. If you’re managing a large Media Library and want to clean up unused images without the risk of breaking your site, you need a tool that can:
- Scan your entire site to identify which images are actually in use
- Check beyond just post content (including page builders, widgets, and theme settings)
- Provide a safe way to review and delete unused files
I developed Image Source Control specifically to solve this problem. The plugin’s unused images feature performs a deep scan of your WordPress site, checking not just post_content but also custom fields, page builder data, WooCommerce products, and theme settings.
When WordPress media trash is enabled with the MEDIA_TRASH constant, Image Source Control also adds a Move to Trash bulk action on the Unused Images page, so you can remove unused files more safely without deleting them permanently right away.
This gives you confidence that when you delete an image, it’s truly unused. And with the media trash feature enabled, you have an additional safety net if something goes wrong.
Conclusion
Enabling the WordPress media trash feature is a simple but effective way to protect yourself from accidental deletions. Whether you choose the manual code method – as I did on this very website – or use a plugin, you’ll gain peace of mind knowing that deleted media files can be restored.
For most users, I recommend the code method using define('MEDIA_TRASH', true); in your wp-config.php file. It’s lightweight, uses native WordPress functionality, and doesn’t require any additional plugins.
If you’re managing a large Media Library and want to go beyond just trash protection, consider using a comprehensive solution like Image Source Control to identify and safely remove unused images.
Ready to enable media trash on your site? Follow the steps above, and you’ll never have to panic about accidentally deleted images again.
FAQ
What happens to a media file when you delete it from the media library in WordPress?
By default, WordPress immediately and permanently deletes the file from the server without sending it to the trash. The file reference has been removed from the database, so it will no longer appear in your Media Library or as a selectable image. This can break any posts or pages that use that image.
Does WordPress have a trash for media files?
No, WordPress doesn’t have a trash feature for media files enabled by default. When you delete a media file, it’s permanently removed from your server immediately. However, you can enable a trash feature by adding define('MEDIA_TRASH', true); to your wp-config.php file.
How do I recover deleted images from WordPress Media Library?
If you’ve enabled the media trash feature using the MEDIA_TRASH constant, you can recover deleted images by going to Media > Library, selecting “Trash” from the filter dropdown, and clicking “Restore” on the files you want to recover. Without this feature enabled, you’ll need to restore images from a backup.
How long do files stay in the WordPress media trash?
Like posts and pages, media files in the trash are automatically deleted after 30 days. You can adjust this period using the constant mentioned in the article.
Can I move unused images to the trash with Image Source Control?
Yes. If WordPress media trash is enabled using the MEDIA_TRASH constant, the Unused Images page in Image Source Control shows a Move to Trash bulk action. This lets you move selected unused images to the Media Library trash instead of permanently deleting them immediately.

Questions? Feedback? How can I help?
Reach out directly via the contact form.