WordPress Media Library Cleanup: Complete Guide (2026)
Complete guide to a WordPress media library cleanup. Learn how to find and remove unused images, optimize storage, and maintain a clean media library.
I’ve managed WordPress sites for over a decade, from small local projects to large portals. One recurring challenge is the media library. It starts organized, but over time, especially with multiple authors or long-running sites, it becomes a digital junkyard.
Recently, I started working with two clients whose media library problems perfectly illustrate why cleanup matters:
Client #1: The Family Archive. A private family blog documenting 20 years of life. Vacations, birthdays, everyday moments. The owner wanted to create a digital archive for his children and grandchildren to explore their family history. Beautiful idea, but the execution hit a wall: over 10,000 images in the media library. Many were duplicates, outdated screenshots from old blog designs, and countless photos uploaded but never published. He wanted to clean it up before handing it over to the next generation. But where do you even start with 10,000+ images?
Client #2: The Second-Hand Shop. An online shop selling used items. Each product gets 3-5 photos. After an item sells, the product is deleted, but the images? They stay in the media library forever. With thousands of products cycling through the shop, the result is thousands of unused images accumulating month after month. The backup alone took over an hour.
Working closely with clients like these is exactly why I built the unused images feature into Image Source Control. Their real-world problems help me understand what actually works and what doesn’t. Every conversation reveals another edge case, another workflow challenge that needs to be solved.
This is not just a problem for family blogs and shops. I’ve seen the same issue on news portals, corporate websites, and membership sites. Unused images pile up silently, affecting performance, increasing backup times, and making it nearly impossible to find the images you actually need.
In this guide, I’ll walk you through everything you need to know about WordPress media library cleanup: why it matters, what clutters your library, and, most importantly, how to clean it up efficiently without accidentally deleting images you still need.
💡 Quick Solution: Automatically find and remove unused images with Image Source Control’s Database Scan method. It scans your entire database and finds images, including those in page builders, WooCommerce, and theme settings.
Summary
Whether you’re wondering how to clean up WordPress media library files manually or looking for automated solutions, this guide covers all methods to clean up WordPress media library efficiently.
Three main methods:
- Manual cleanup: Using WordPress’ built-in Media Library features. Time-consuming and error-prone, but it works for small sites.
- Plugin-based cleanup: Tools like Image Source Control scan your site, including post content, meta fields, page builders, and WooCommerce—the most reliable method.
- SQL queries: For experienced developers who need maximum control. Requires technical expertise and careful verification.
Important: Always back up your website before deleting images. Some images might be used in widgets, theme settings, or page builders where WordPress doesn’t track them.
Why WordPress Media Library Cleanup Matters
Before diving into the how, let’s talk about the why. Unused images aren’t just digital clutter. They have real, measurable impacts on your website, your workflow, and even your hosting costs.
If you’ve been searching for ways to clean media library WordPress installations, you’re not alone. Many site owners struggle with the same question: how do you clean WordPress media library files without breaking your site? The answer depends on your site’s size, complexity, and technical comfort level.
Storage Space and Hosting Costs
Here’s something many WordPress users don’t realize: every image you upload gets stored multiple times. WordPress automatically creates several versions of each image (thumbnail, medium, large, and sometimes custom sizes defined by your theme or plugins).
Upload one 3 MB photo, and WordPress might create 5-7 different versions. Suddenly, that single image consumes 6-8 MB of disk space.
Let’s do the math for my second-hand shop client:
- 1,000 sold products × 4 images per product = 4,000 unused images
- Average 2 MB per original image = 8,000 MB
- With WordPress’s multiple versions: ~16 GB of wasted storage
On cheaper hosting packages, this can cause you to exceed your storage limit. I’ve seen clients forced to upgrade their hosting plan not because of traffic, but because unused images were consuming disk space.

Backup Size and Time
This is where unused images really hurt. I learned this lesson the hard way on one of my larger sites.
I had about 800 unused images totaling roughly 2 GB. My backups were taking 45 minutes to complete. After cleaning up those unused images, backup time dropped to 12 minutes. That’s a 73% reduction in backup time.
Why does this matter?
- Backup costs: Many backup services or hosting providers charge based on storage size. More images = higher monthly fees.
- Restore time: In an emergency, every minute counts. A 12-minute restore is far better than a 45-minute one.
- Backup reliability: Larger backups are more likely to fail or time out, especially on shared hosting.
If you’re running automated daily backups, those extra 33 minutes add up. That’s over 16 hours per month your server spends backing up files you don’t even use.
Website Performance
Unused images don’t directly slow down your frontend page speed since they’re not loaded on pages, but they do affect your site’s backend performance:
- Media Library loads slowly: With over 10,000 images, the Media Library grid view can take 10-15 seconds to load. That’s frustrating when you’re trying to find a picture quickly.
- Database size: Each image creates multiple database entries (post, post meta, attachment metadata). More entries = larger database = slower queries.
- Search performance: WordPress’ media search has to sift through thousands of entries, making it sluggish.
I’ve noticed this especially on sites with multiple authors. When everyone’s waiting 15 seconds for the Media Library to load, productivity suffers.
Workflow Efficiency and Mental Load
This is the impact I feel personally the most. When I’m writing a tutorial or blog post, I often want to reuse existing screenshots or images. I search the media library, and instead of finding what I need, I’m scrolling through:
- Outdated screenshots from 3 years ago
- Duplicate uploads with slightly different names
- Images from deleted posts
- Test images someone – mostly I … – uploaded and forgot about
It’s not just about the time spent searching. It’s the mental load of constantly wondering: “Is this screenshot still current? Should I use this one or upload a new one? Where did I see that other version?”
Environmental Impact
Here’s something I learned at WordCamp Leipzig some time ago: server efficiency matters for the environment. Every megabyte stored on a server requires energy. Backing up 16 GB of unused images every night results in increased server resources, higher energy consumption, and a larger carbon footprint.
It’s a small thing, but if thousands of WordPress sites cleaned up their media libraries, the cumulative impact would be significant. It’s one of those rare cases where doing the right thing for your site also happens to be better for the planet.
What Clutters Your WordPress Media Library?
Not all media library clutter is the same. Understanding what’s taking up space helps me decide what to remove and what to keep when I clean up WordPress media library files. Let’s break down the different types of files that accumulate over time.
Unused Images
Unused images are files that exist in your media library but aren’t displayed anywhere on your website. They’re not in posts, pages, widgets, theme settings, or page builders. They’re just sitting there, taking up space.
How do they get there?
- Deleted posts: You delete a blog post, but WordPress doesn’t automatically delete its images.
- Theme changes: Your old theme used a custom header image. You switched themes. The old header? Still in the media library.
- Draft posts that never published: You uploaded images for a post idea that never went live.
- Replaced images: You uploaded a better version of a photo but forgot to delete the old one.
- Test uploads: During site development, you uploaded test images that were never meant to go live.
On my second-hand shop client’s site, this is the biggest issue. Every time a product sells and gets deleted, 3-5 product images become unused. Multiply that by thousands of products, and you see the problem.
Unattached Images – Not the same as Unused Images
Here’s where it gets confusing. Unattached images are NOT the same as unused images, even though many people think they are.
In WordPress, an image is “attached” to a post if it was uploaded while editing that specific post. You can see this in the Media Library’s “Uploaded to” column. If that column is empty, the image is “unattached.”
But here’s the catch: an unattached image can still be used on your site. For example:
- A logo uploaded via the theme customizer
- A background image set in your page builder
- A favicon uploaded through WordPress settings
- An image added to a widget
WordPress’s “Uploaded to” column only tracks the post you were editing when you uploaded the image. It doesn’t track where the image is actually used.
I wrote a detailed guide on how to delete unattached media in WordPress that explains this distinction in depth. The short version: never assume “unattached” means “unused.”
Duplicate Images
Duplicate images are exactly what they sound like: the same image uploaded multiple times, often with slightly different filenames.
This happens more often than you’d think:
- Multiple authors: Two people upload the same company logo as
logo.pngandcompany-logo.png. - Forgotten uploads: You can’t find an image in the media library, so you upload it again.
- Renamed files: You upload
screenshot.png, then later uploadscreenshot-updated.pngwithout deleting the original.
On the family blog client’s site, I found the same vacation photo uploaded 4 times with names like beach-2015.jpg, beach-vacation.jpg, summer-beach.jpg, and IMG_4521.jpg. Each one taking up space, each one creating confusion.
Outdated Images
Outdated images are technically “used” on your site, but they shouldn’t be. They’re old screenshots, deprecated product photos, or images that no longer reflect your current branding.
I deal with this constantly on the Image Source Control homepage. Here are some real examples from my own media library:
- Old release announcement posts: I have screenshots from ISC version 2.x showing the old interface. The posts are still live, but the screenshots are completely outdated. Visitors reading those posts see an interface that doesn’t match the current version.
- Multiple logo uploads: I’ve uploaded the ISC logo at least 5 times over the years because I couldn’t find the previous version in the media library. Each time with a slightly different filename:
isc-logo.png,logo-isc.png,image-source-control-logo.png. All taking up space, all creating confusion. - Outdated feature screenshots: Feature pages showing plugin screens that have been redesigned. The functionality is the same, but the UI looks different now. I need to update these, but first I need to find them.
This is where ISC’s own features help me. The “Appearances” column shows me exactly where each image is used, making it much easier to review outdated screenshots and decide which posts need updating. Without that, I’d have to open every post and check manually.

These are harder to identify automatically because they’re still “in use” according to WordPress. You need human judgment to decide if they should stay or go. But knowing where they’re used is the first step.
Unoptimized Images
Unoptimized images aren’t necessarily unused, but they’re wasting space unnecessarily.
Common issues:
- Massive file sizes: A 5 MB photo when a 500 KB version would look identical on the web.
- Wrong formats: PNG files for photos (should be JPG) or JPG files for logos (should be PNG or SVG).
- Oversized dimensions: Uploading a 4000×3000 pixel image when your theme only displays 1200×900 maximum.
I always recommend running images through TinyPNG before uploading, or using a plugin like ShortPixel to compress images already in your library. I also wrote about using the Modern Image Formats plugin to automatically convert images to WebP, which can reduce file sizes by 25-35% without quality loss.
While this guide focuses on removing unused images, optimizing the images you keep is just as important for overall media library health.
Method 1: How to Clean Up WordPress Media Library Manually
The most basic approach to WordPress cleanup media library tasks is doing it manually using WordPress’s built-in features. This method doesn’t require any plugins or technical knowledge, but it’s time-consuming and has significant limitations.
Let me walk you through how it works and when it makes sense to use this approach.
Using the WordPress Media Library
WordPress gives you a few tools to help identify potentially unused images. Here’s the step-by-step process:
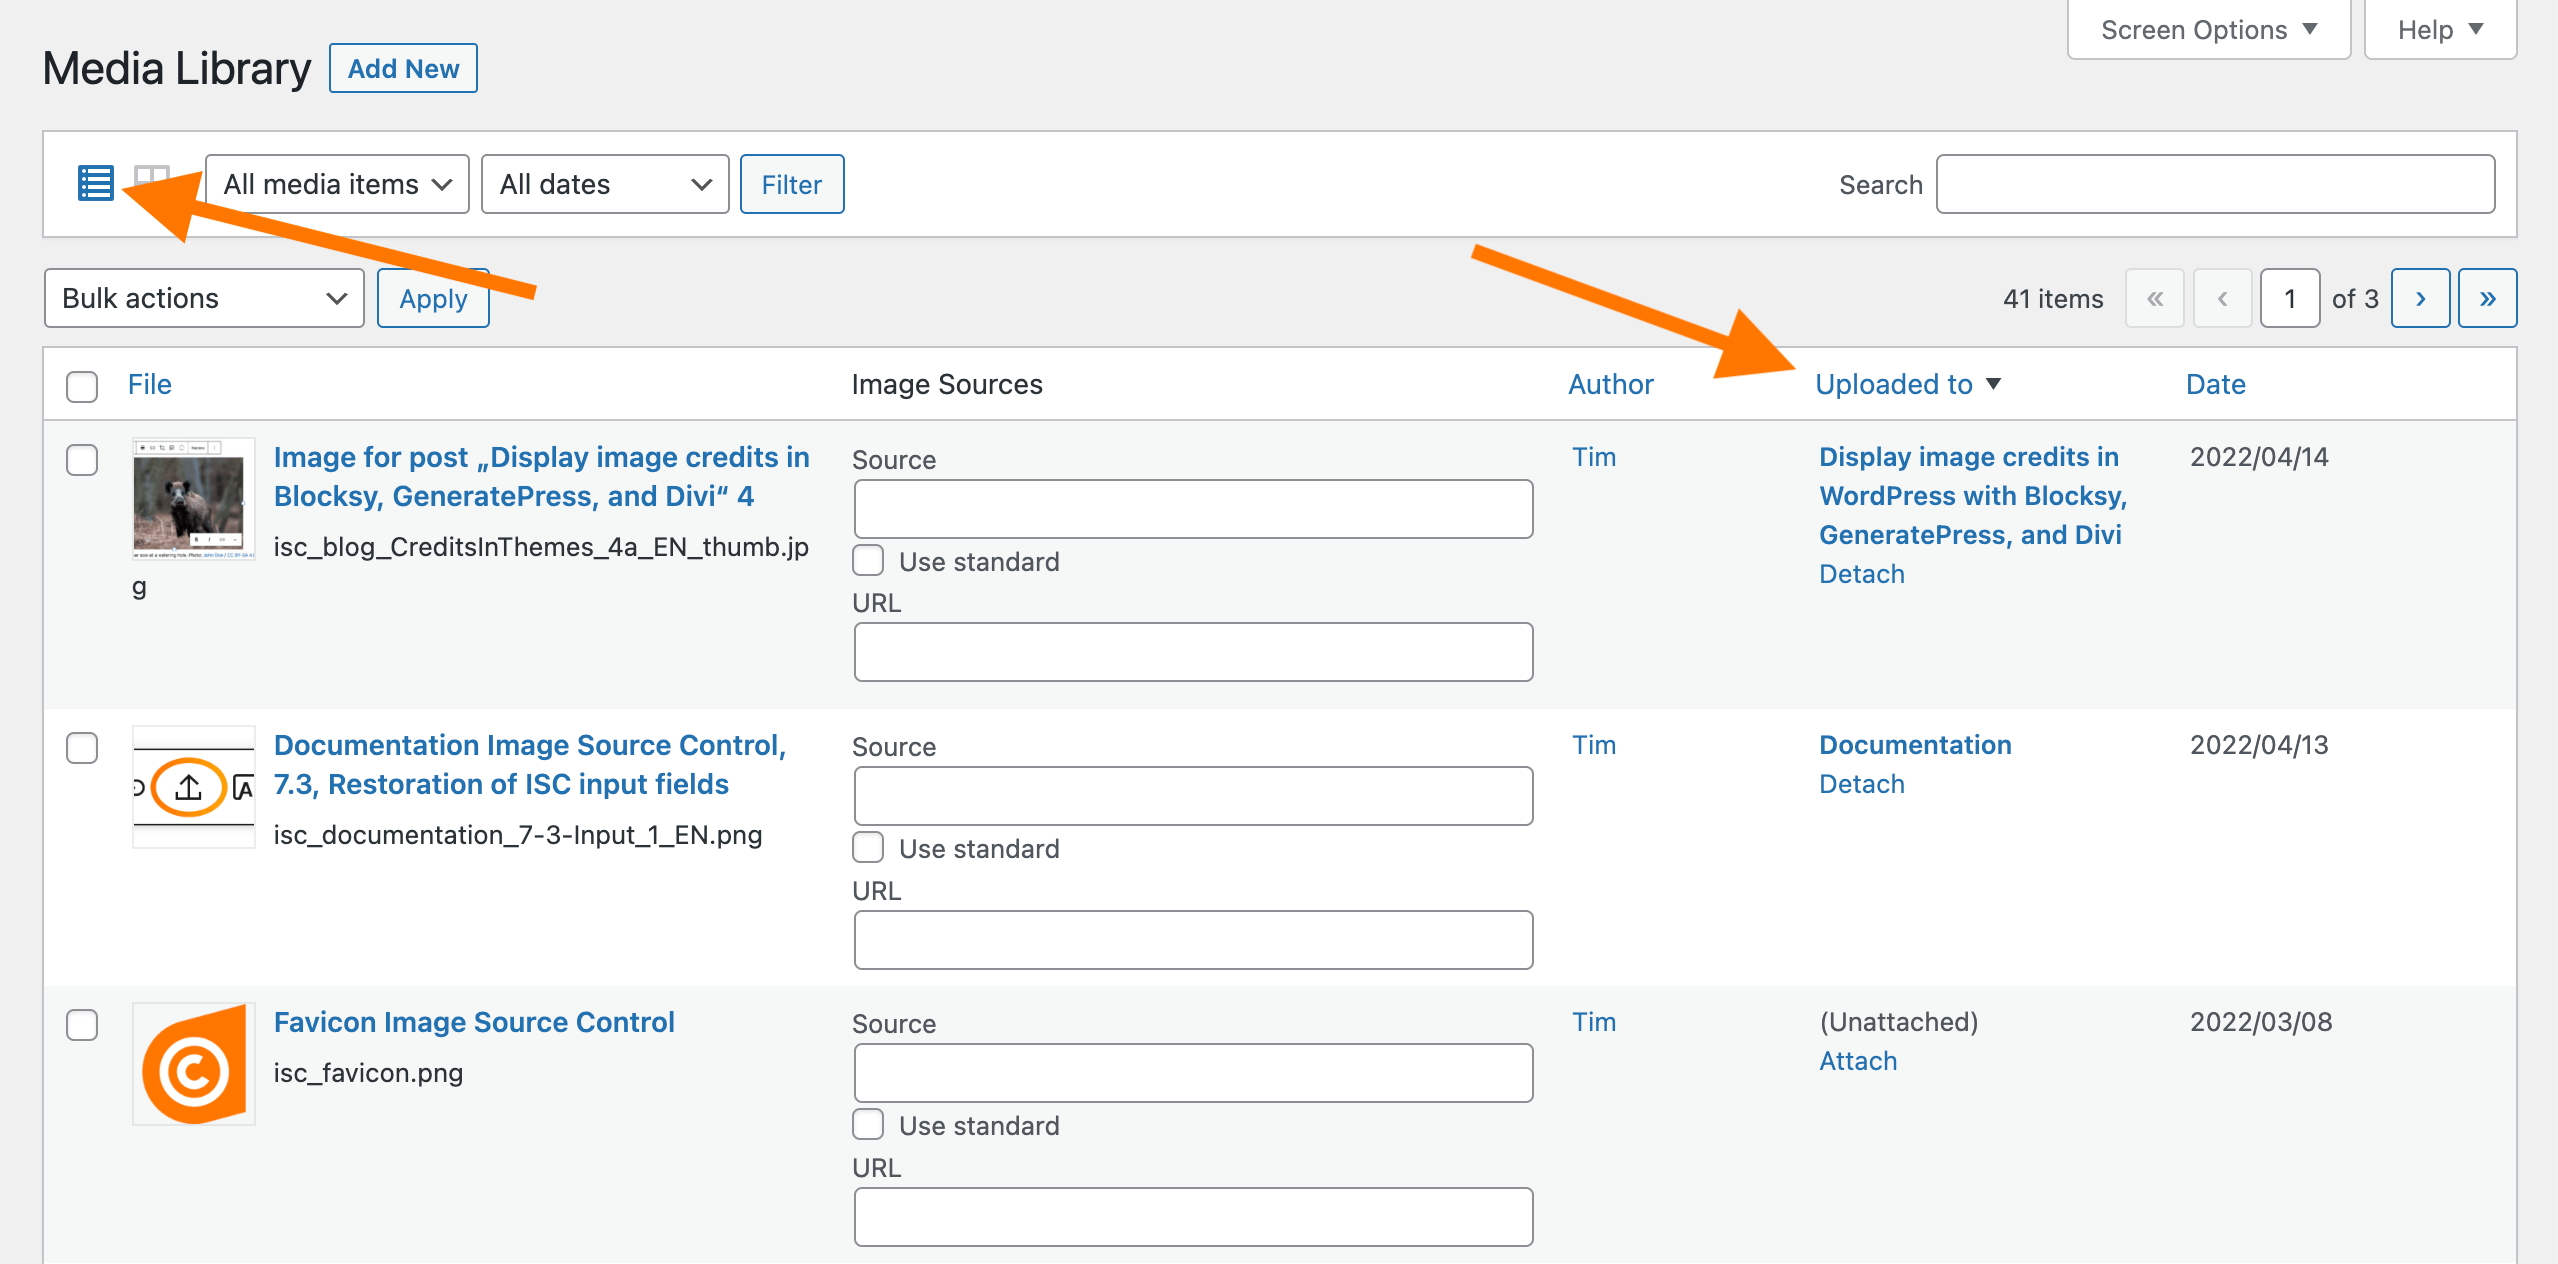
Step 1: Switch to List View
By default, WordPress shows your media library in grid view. Switch to list view by clicking the list icon at the top left of the Media Library screen. List view gives you much more information about each image.
Step 2: Check the “Uploaded to” Column
In list view, you‘ll see an “Uploaded to” column. This shows which post or page you were editing when you uploaded the image. If this column is empty, the image is “unattached.”
Many people assume empty = unused, but that‘s not true. As I mentioned earlier, images used in widgets, theme settings, or page builders often show as unattached even though they’re actively used on your site.
Step 3: Sort by Date
Click the “Date“ column header to sort images by upload date. Older images are more likely to be unused, especially if they‘re from deleted posts or old website versions.
Start with images from several years ago and work your way forward. This gives you a better chance of finding genuinely unused files.
Step 4: Manual Verification
Here‘s where it gets tedious. For each potentially unused image, you need to:
- Click on the image to open its details
- Copy the image filename or URL
- Search your site’s frontend to see if it appears anywhere
- Check your posts and pages in the backend
- Look for the image in widgets, menus, and theme settings
- Verify it’s not used in any page builder content
Only after confirming the image isn‘t used anywhere can you safely delete it.
Step 5: Delete Permanently
Once you‘ve verified an image is truly unused, click “Delete permanently“ in the image details screen. You can also select multiple images in list view and use the “Delete permanently“ bulk action.
Important: WordPress doesn’t warn you if an image is still in use. If you delete an image that‘s actually displayed somewhere, you‘ll get broken image links on your site.
Limitations of Manual Cleanup
I‘ve used this manual method many times over the years, especially in the early days before I built the unused images feature into Image Source Control. Here‘s what I learned: it‘s frustrating and unreliable.
Time-consuming
On my family blog client‘s site with 10,000+ images, manually checking each one would take weeks. Even on smaller sites with a few hundred images, you‘re looking at several hours of work.
Let‘s say it takes 2 minutes to verify each image (search, check posts, verify it’s not in widgets). For 500 images, that‘s over 16 hours of work. That‘s two full workdays spent clicking through your media library.
Error-prone
Even with careful checking, it‘s easy to miss where an image is used:
- Page builders: Elementor, Divi, and Beaver Builder store images in post meta, not in the post content. A manual search won‘t find them.
- Theme settings: Custom headers, logos, and background images set through the customizer aren‘t tracked in the “Uploaded to“ column.
- Widgets: Images in widget areas don‘t show up in standard searches.
- WooCommerce: Product images, gallery images, and variation images are stored differently from regular post images.
- Custom fields: ACF and other custom field plugins store image references in post meta.
I‘ve accidentally deleted images I thought were unused, only to discover hours later that they were used in a widget or page builder section. That‘s not a mistake you want to make on a live site.
No bulk verification
You have to check images one by one. There‘s no way to bulk-verify that a group of images is safe to delete. This makes the process even slower.
“Uploaded to“ is misleading
The “Uploaded to“ column only shows where you were when you uploaded the image, not where it‘s actually used. An image can be “attached“ to a post but used on 10 other pages. Or it can be “unattached“ but used as your site logo.
This column gives you a starting point, but it‘s not reliable enough to make deletion decisions.
When Manual Cleanup Makes Sense
Despite all these limitations, manual cleanup can work in specific situations:
- Very small sites: If you have fewer than 50 images total, manual checking is manageable.
- Single-author sites: When you‘re the only person who’s ever uploaded images, you probably remember what‘s used and what isn‘t.
- Recent uploads: If you just uploaded a batch of images for a project that got canceled, you can safely delete them manually since you know they were never used.
- Specific cleanup tasks: Removing all images from a particular date range or with a specific naming pattern.
For everyone else, especially sites with multiple authors, page builders, or WooCommerce, manual WordPress image cleanup is too risky and time-consuming. That’s where plugins come in.
Method 2: Plugin-Based Cleanup (ISC)
After years of manually checking images and writing custom SQL queries, I built the unused images feature into Image Source Control. Not because I wanted to add another feature to the plugin, but because I needed it for my own projects.
The manual method was too slow. SQL queries were too risky. I needed something that could scan my entire site, understand how WordPress actually stores images, and give me a reliable list of what’s safe to delete.
That’s what this section is about: how to use Image Source Control to clean up WordPress media library efficiently and safely, going beyond basic WordPress cleanup media library approaches.
Why Image Source Control is Different
Several plugins claim to find unused images in WordPress. I’ve tried most of them over the years. Here’s what I learned: most of them only scan post content.
They look at the post_content field in your database and check if an image URL appears there. If it doesn’t, they mark the image as “unused.” Simple, fast, and completely unreliable.
Why? Because modern WordPress sites don’t just store images in post content:
- Page builders like Elementor, Divi, and Beaver Builder store images in post meta fields with serialized data structures.
- WooCommerce stores product images, gallery images, and variation images in custom fields and taxonomies.
- Theme settings store logos, headers, and background images in the options table.
- Widgets store images in serialized widget data.
- Custom fields from ACF, Pods, or Toolset store images in post meta.
If a plugin only scans post content, it’ll mark all these images as “unused” even though they‘re actively displayed on your site. Delete them, and you’ll break your site.
Image Source Control takes a different approach. It was initially built to manage image sources and captions with high legal reliability, which means it already had to track where every image is used across your entire site. That same technology powers the unused images feature.
How ISC Finds Unused Images
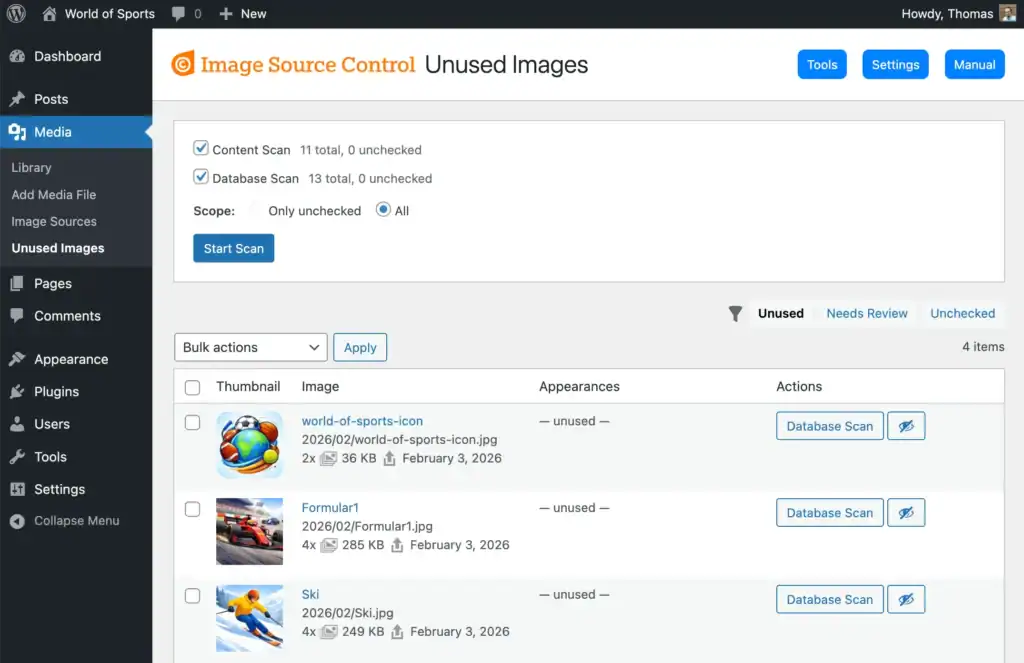
Image Source Control uses two methods to identify unused images: Content Scan and Database Scan.
While the Content Scan visits each published post and page like a real user to check for used images, the Database Scan looks for each image in your Media Library in the depths of the database.
Navigate to Media > Unused Images in your WordPress dashboard. At the top of the page, you can start the Scanner and choose which method to use and whether to look through all or only unindexed items.
You’ll see a progress bar showing how many posts and images have been scanned. You don’t need to look at the page while this happens – the Scanner will continue running even if you do something else. Though you need to keep the tab open.
For most sites, the initial scan takes 1-5 minutes. Larger sites with thousands of posts will take more.
What distinguishes the Scanner in Image Source Control from other plugins is that it doesn’t just look into the database, but at the truly generated content on the page. This way, it also detects dynamically added images, such as those inserted by blocks or shortcodes within the post content.
When the appropriate option is enabled, the Content Scan examines the entire frontend HTML, not just the content, and therefore identifies images in widgets and other areas as well.
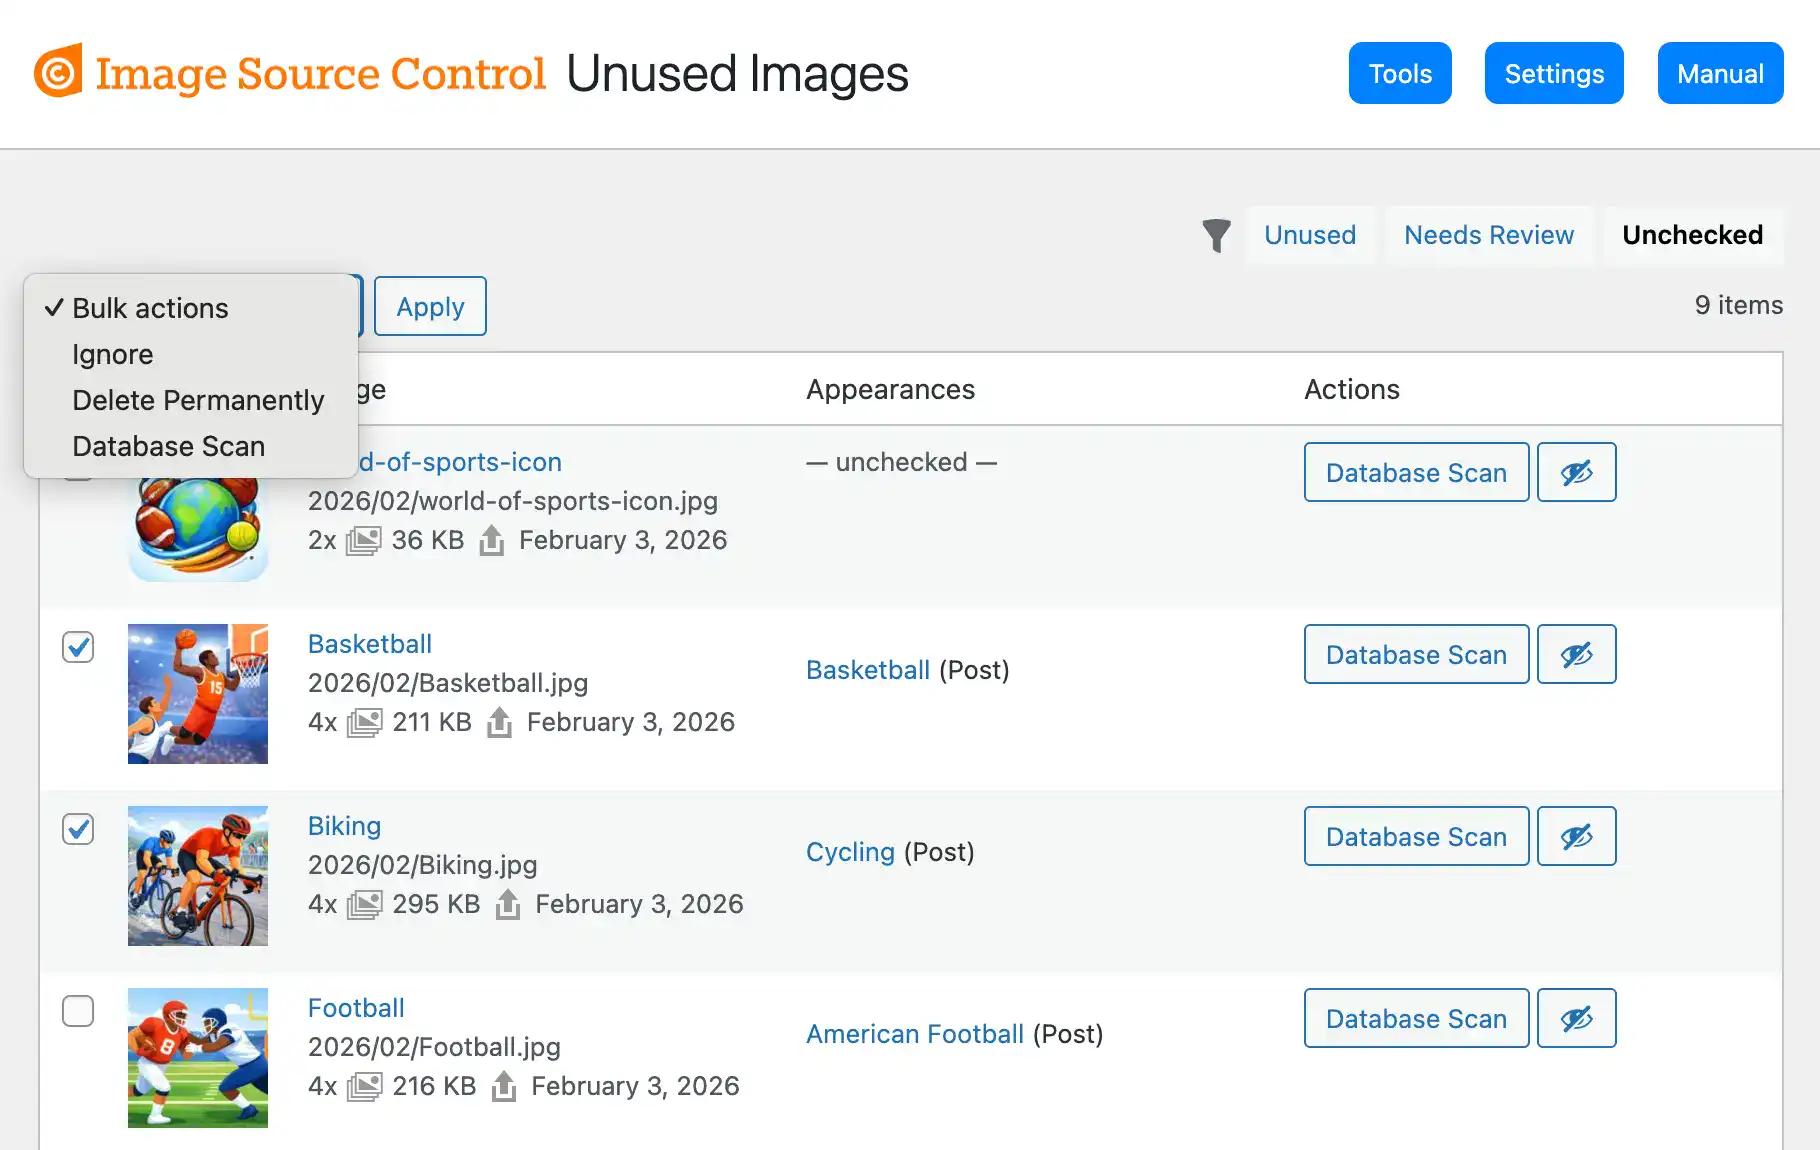
After the Scanner finishes, you’ll see unused images listed on the Media > Unused Images page.
Database Scan
The Database Scan is part of the Scanner, but you can also run it for individual images.
The Database Scan gives Image Source Control the final touch of reliability. It scans beyond post content to find images stored in:
- Post meta fields: Where page builders, custom fields, and plugins store image data
- Options table: Where theme settings, widgets, and plugin configurations are stored
- WooCommerce data: Product images, galleries, and variations
- WordPress core settings: Site icon (favicon), custom header, custom background
When you run the Database Scan on an image, ISC thoroughly scans your entire database for any references to that image by its ID or URL.
Step-by-Step: Clean Up with ISC
Let me walk you through the complete process of cleaning up your media library with Image Source Control.
Step 1: Install and Activate
Purchase Image Source Control from the pricing page, download the plugin, and install it as you would any other WordPress plugin. Go to Plugins > Add New > Upload Plugin(?), select the ZIP file, and click “Install Now.” Then activate the plugin.
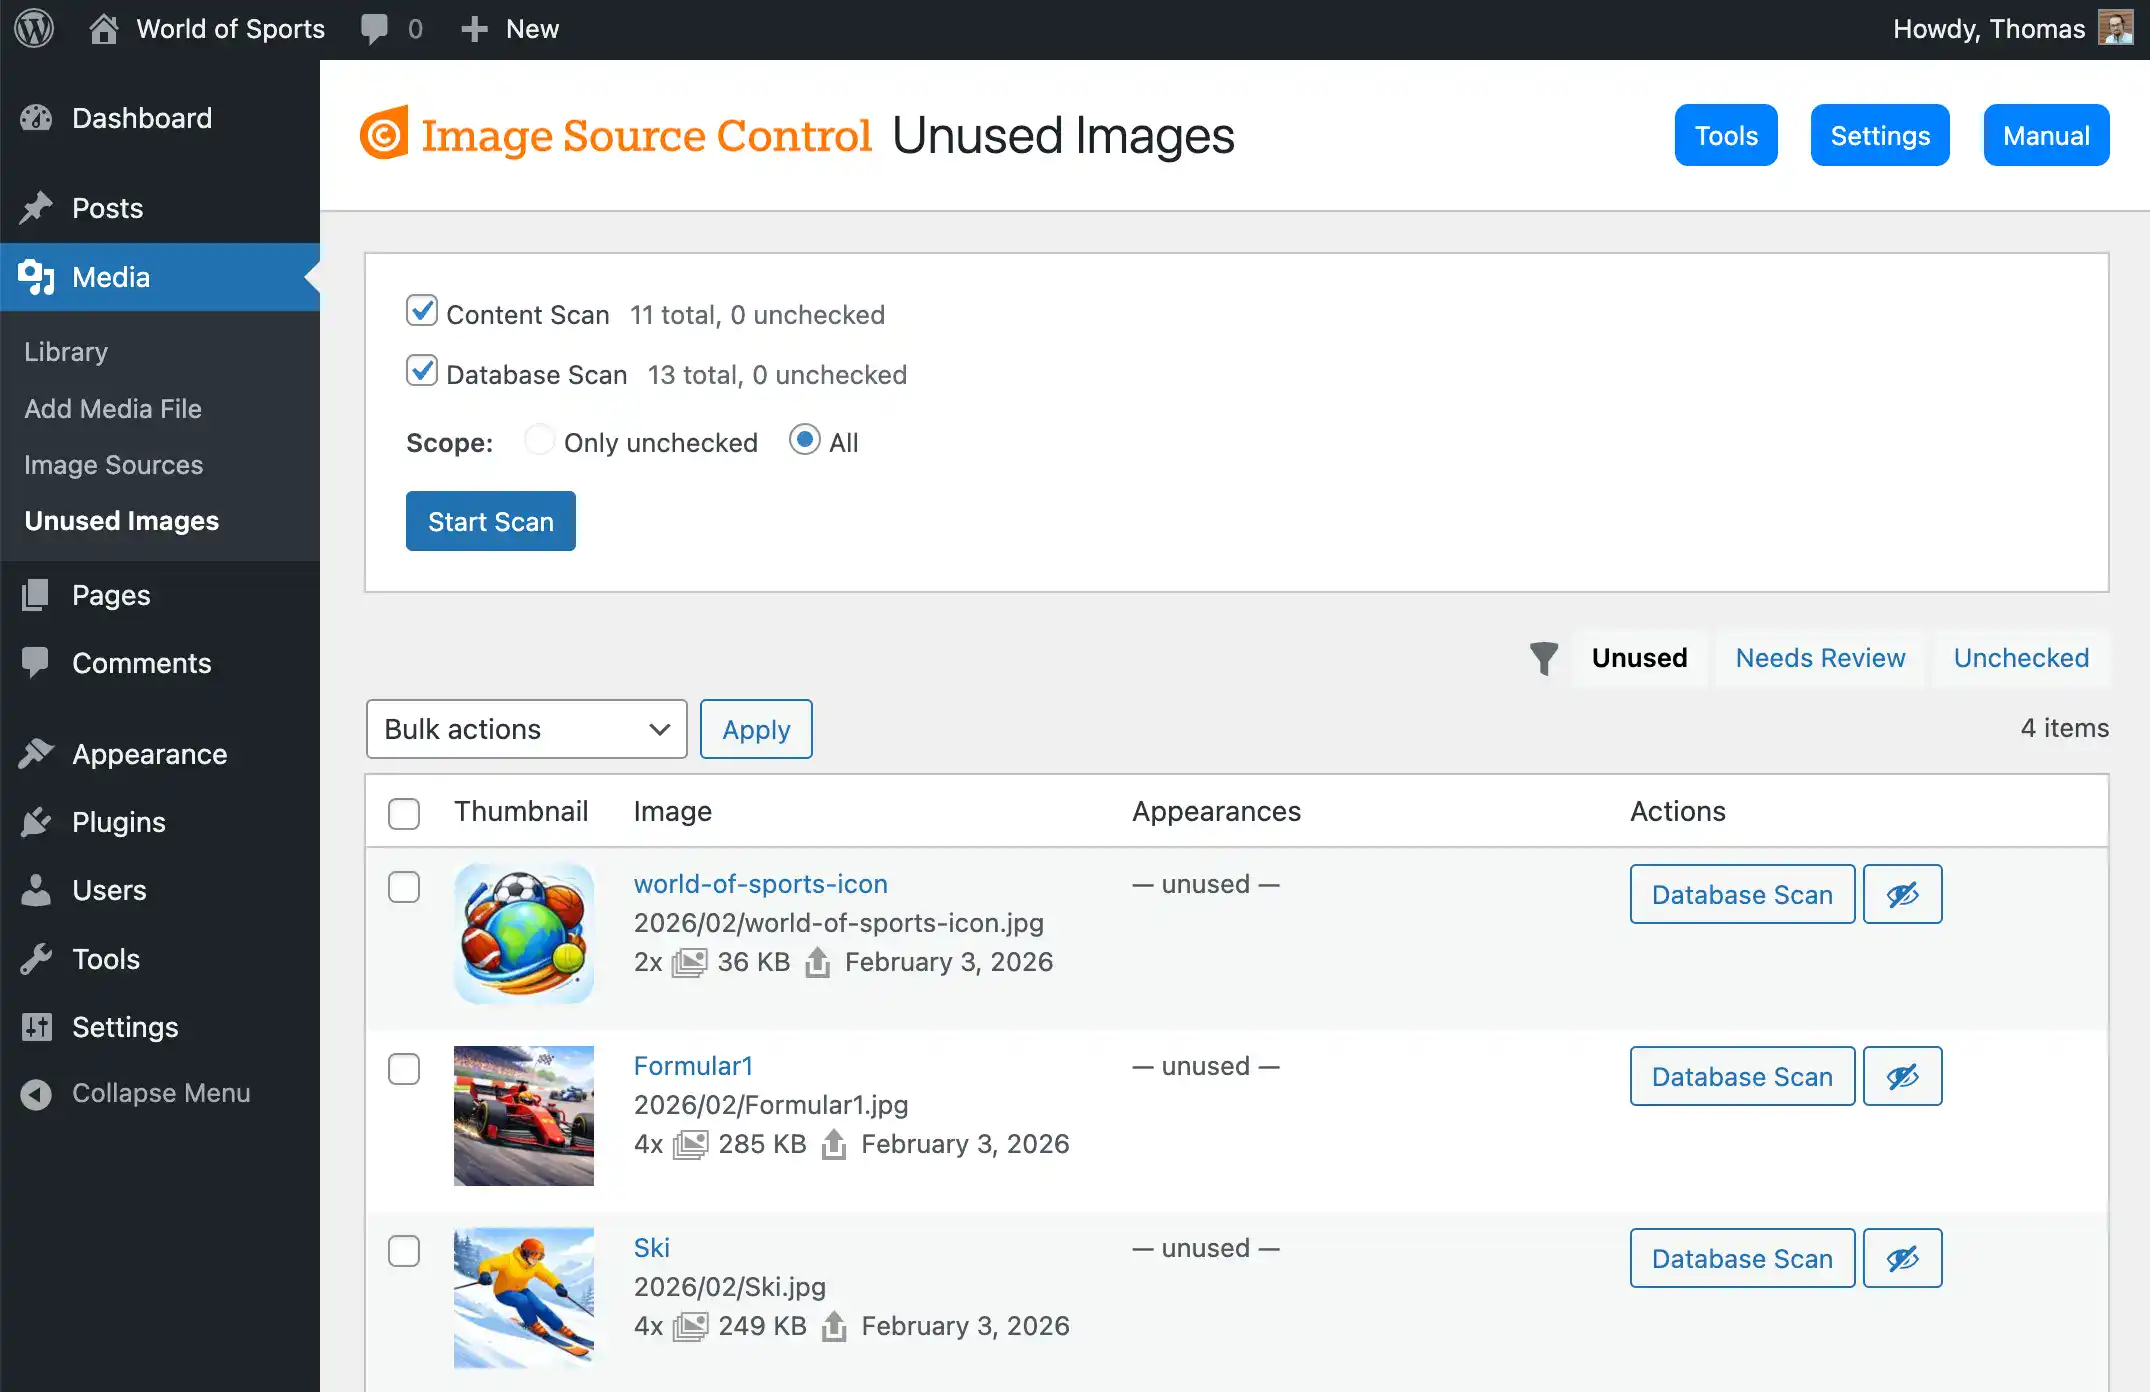
Step 2: Start the Scanner
After activation, go to Media > Unused Images and start the Scanner at the top. Keep the default settings for a first complete run.
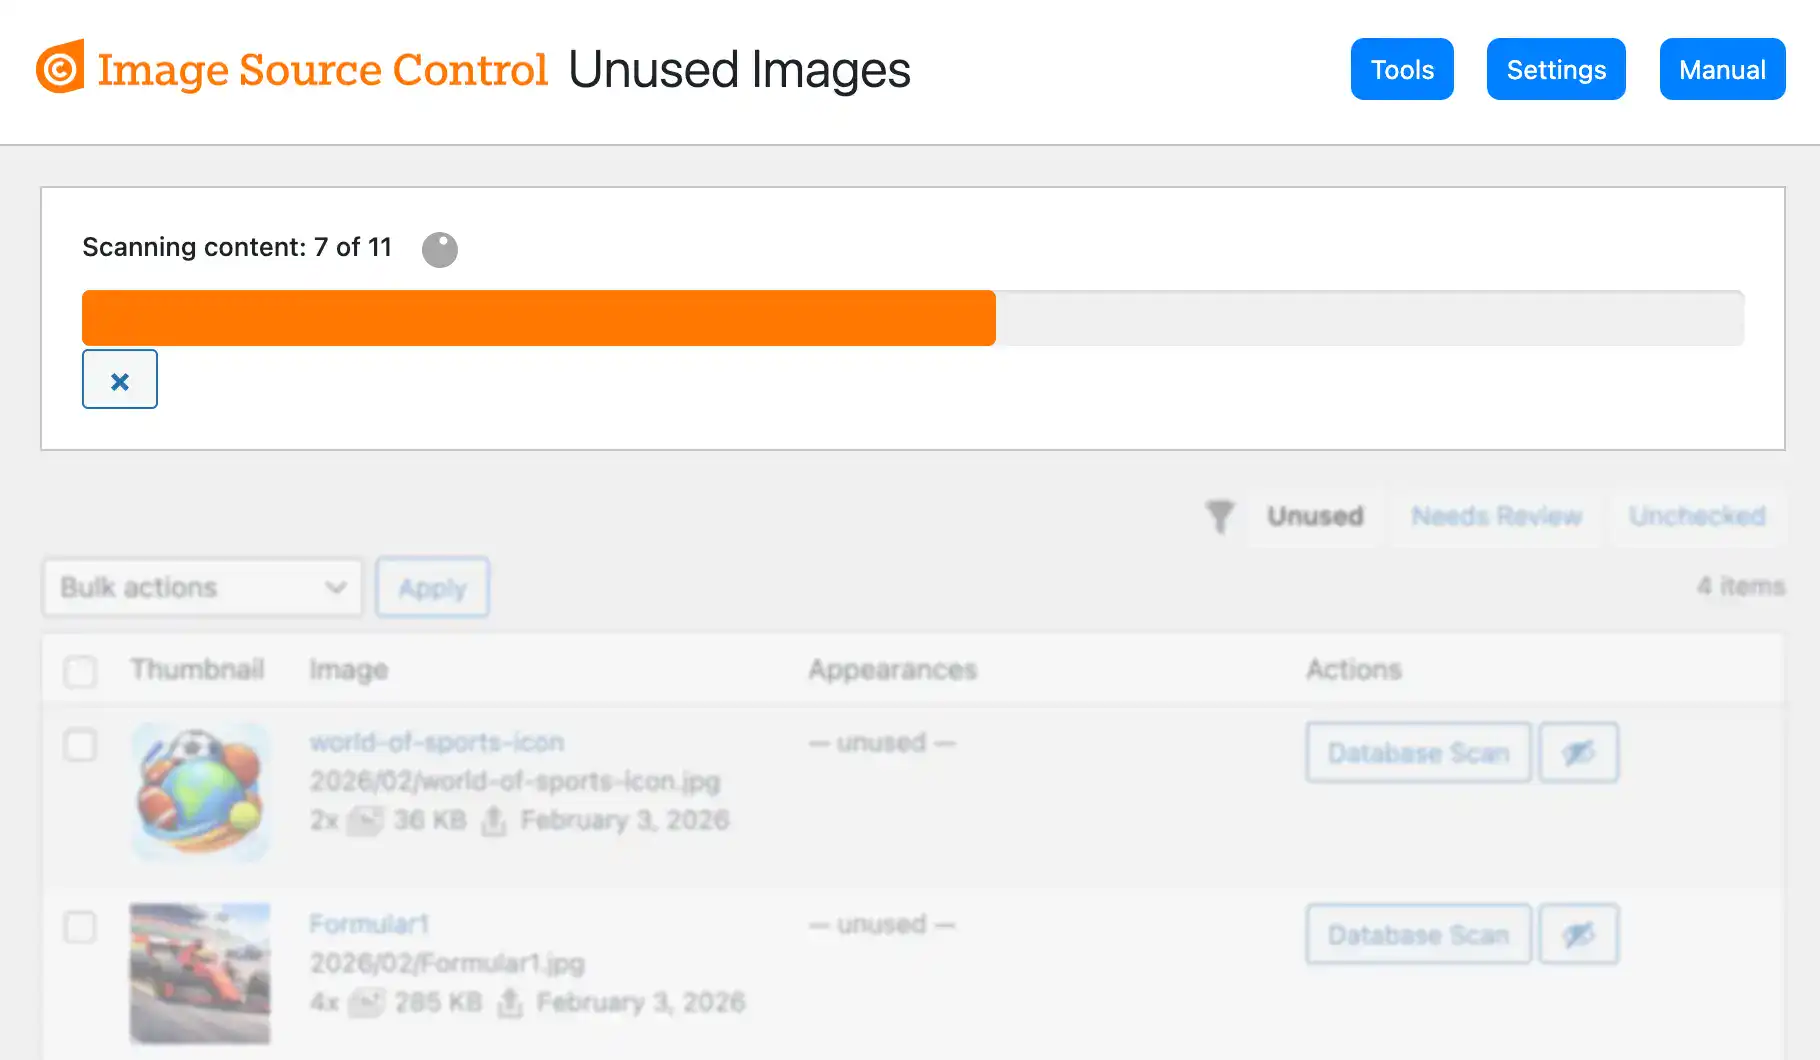
You’ll see a progress bar indicating when it is finished.
For most sites, this takes 1-5 minutes. Larger sites with thousands of posts might take significantly more. You can continue working on your site in a new tab while this happens.
Step 3: Reload the Unused Images page
Once the Scanner finishes, reload the Unused Images page. You’ll see the updated table listing all images that weren’t found in your post content or database.
Step 4: Review the list of Unused Images:
By default, you will see the list of unused images not found by any of the scan methods.
Take a moment to review this list. Look for:
- Images you recognize as unused (old screenshots, test uploads, etc.)
- Images you‘re unsure about (when in doubt, don’t delete)
- Images with very recent upload dates (might be for upcoming posts)
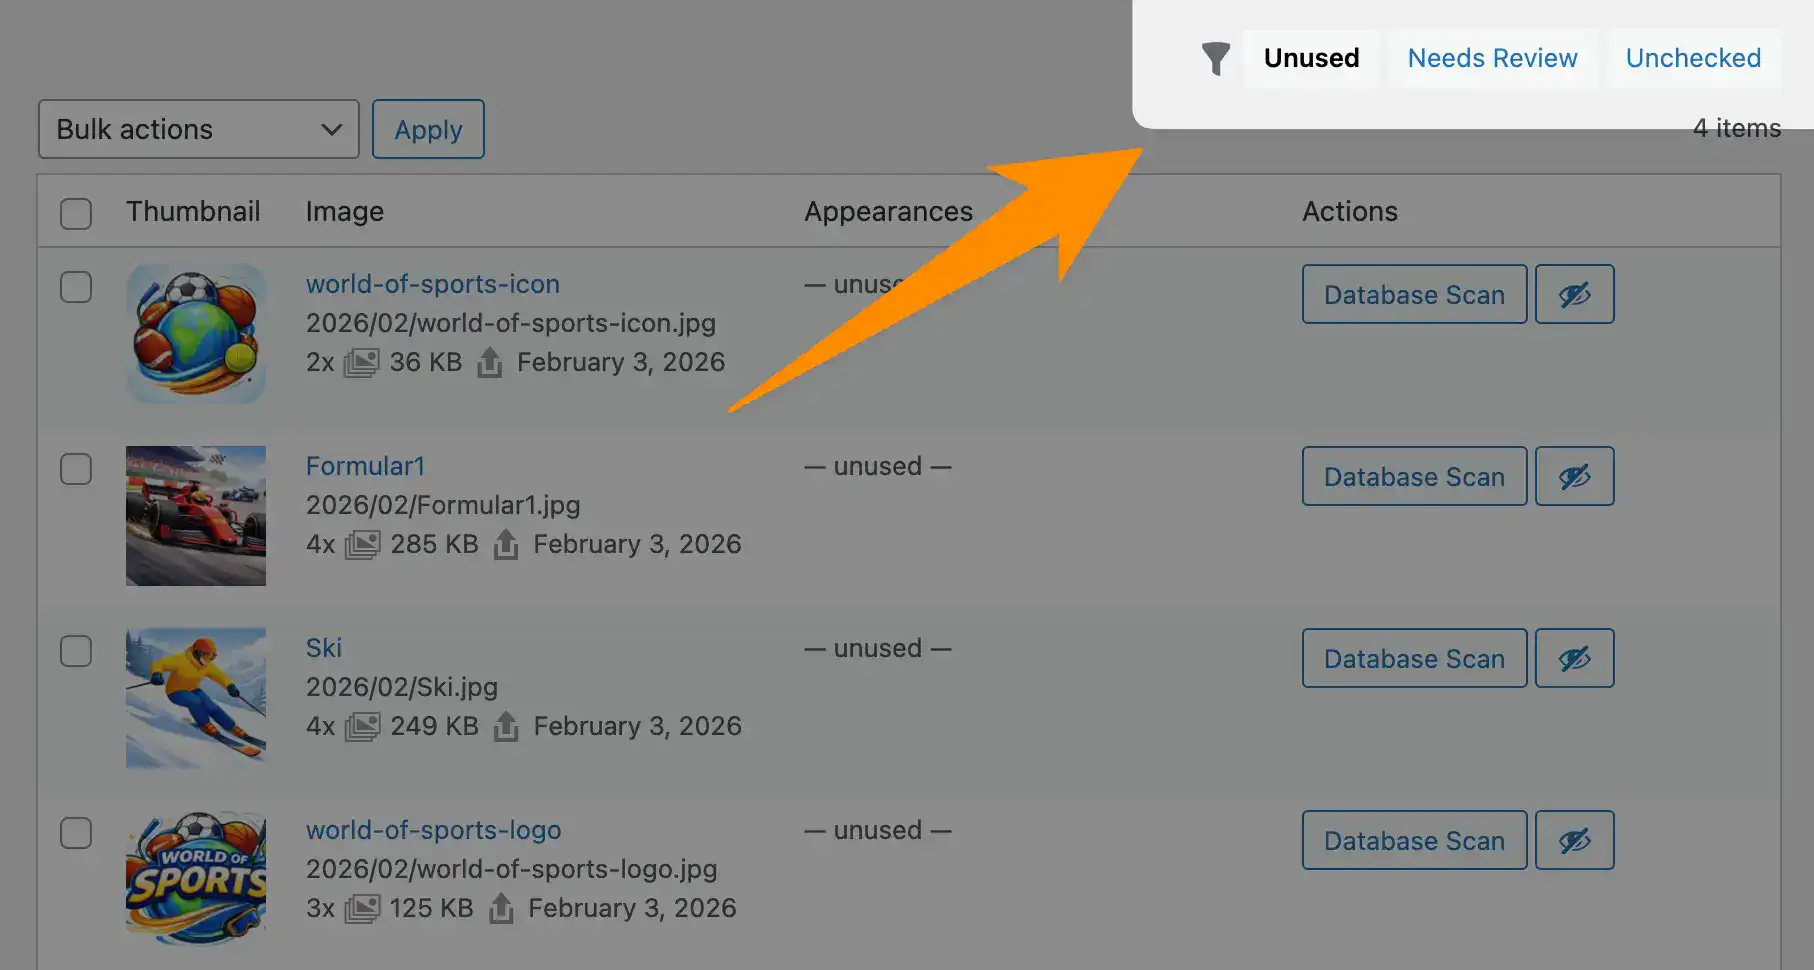
Step 5: Filter the image list (optional)
Images that the Scanner doesn’t find in the content, but in the database, e.g., options or post meta, are listed in the “Needs Review” table, which you can reach through the filters on the page.
Usually, this list is rather short, but the information there may require more technical knowledge to decide whether an image here is still in use or can be removed.
If you are sure an image is still being used, you can click the action button to move it to the “Ignored” list.
Step 6: Delete Unused Images
Once you‘re confident about which images to remove:
- Select the images using the checkboxes
- Choose “Delete Permanently” from the bulk actions dropdown
- Click “Apply”
- Confirm the deletion
ISC will delete the images from your media library and remove the actual files from your server. This action is permanent, so make sure you have a backup if you’re nervous.

Step 7: Verify Your Site
After deleting images, take a few minutes to browse your site and ensure everything still appears correct. Check:
- Your homepage
- A few recent blog posts
- Your most important pages
- Any page builder sections
- WooCommerce product pages (if applicable)
If you notice any broken images, you can restore them from your backup.
ISC Features for Media Library Management
Beyond just finding unused images, Image Source Control offers several features that help you maintain a clean media library long-term:
Automatic Background Updates
Once set up, ISC continuously monitors your site. Every time you publish, update, or delete content, the index is automatically updated. Unindexed pages can also be indexed in one go using the Content Scan in the Scanner.
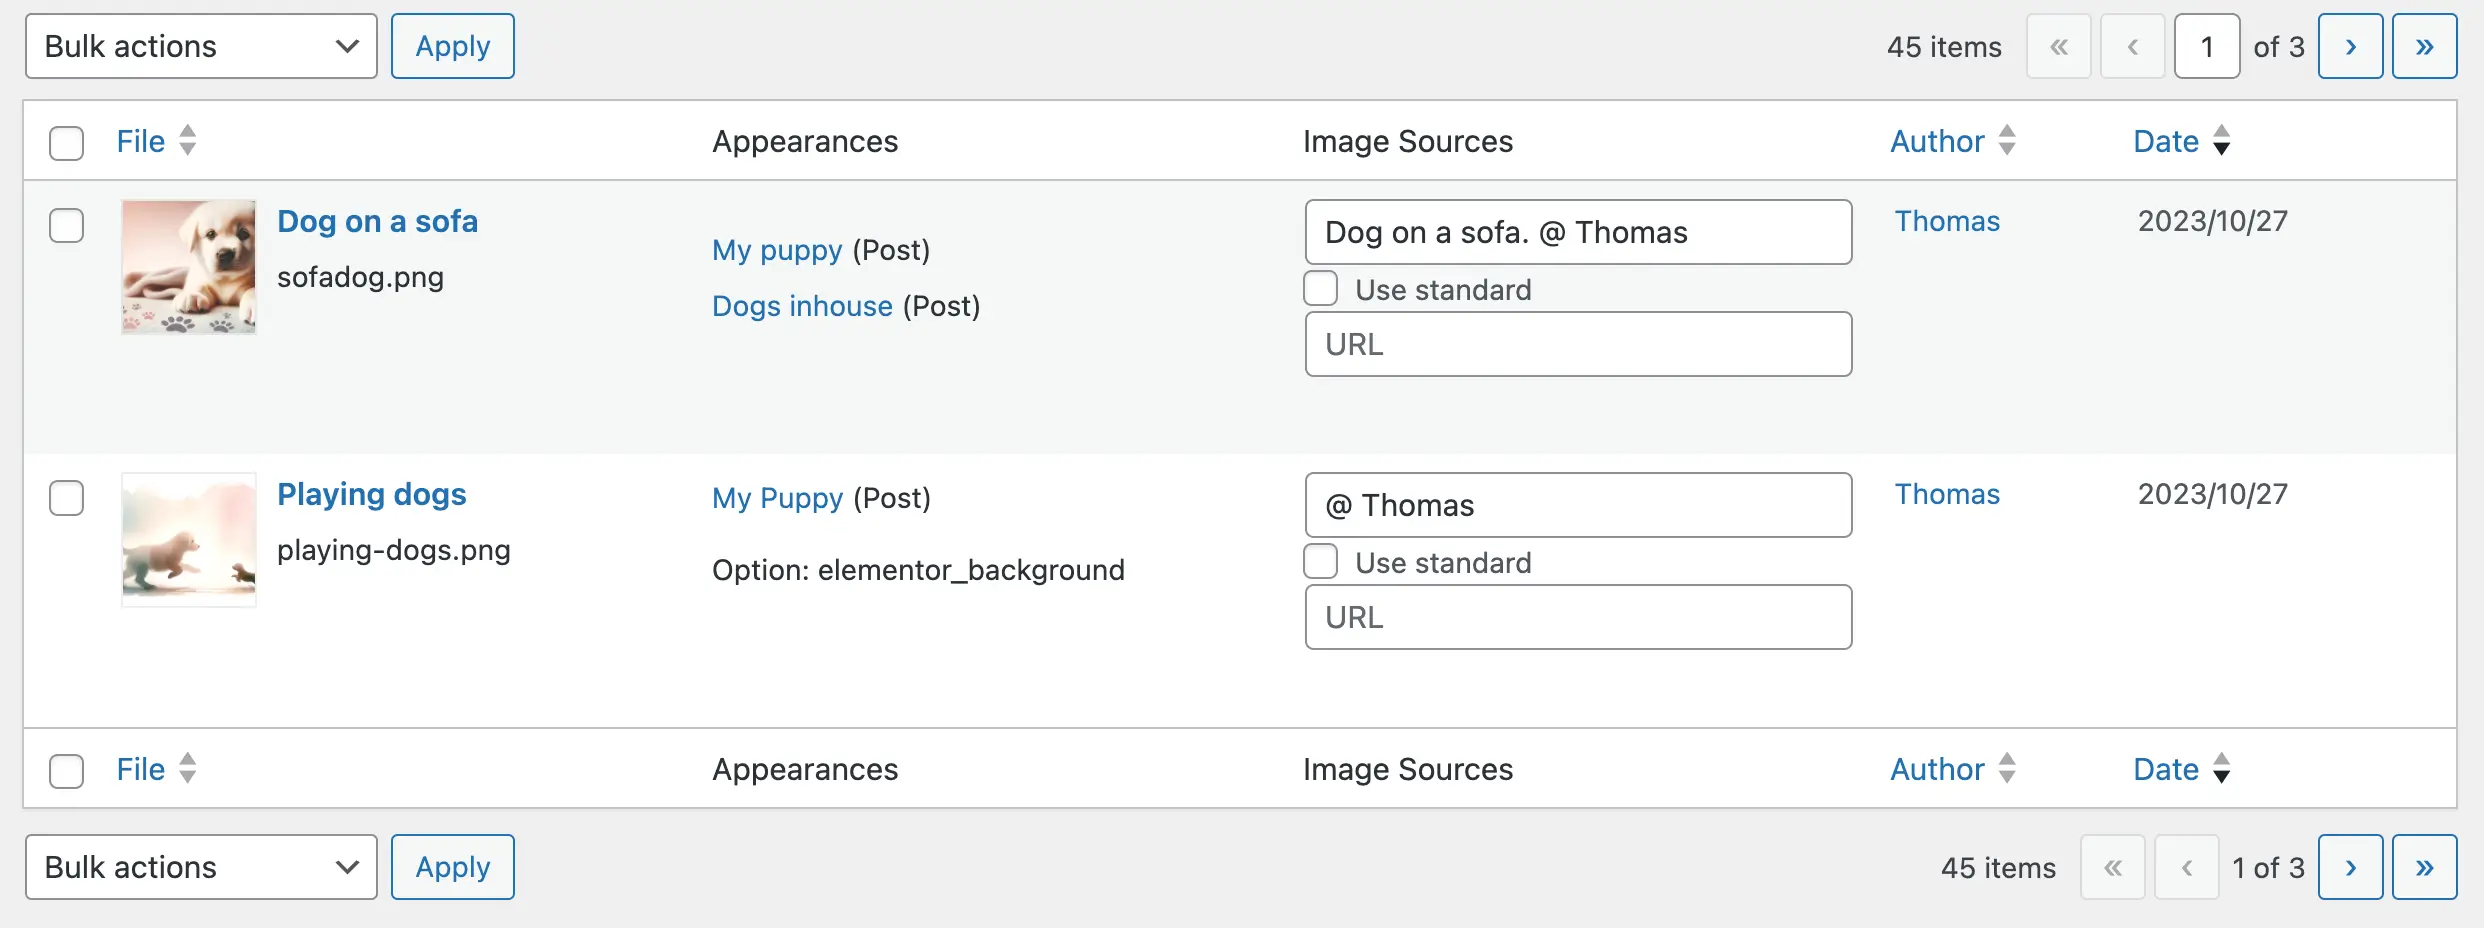
Appearances Column
In your regular Media Library, ISC adds an “Appearances” column showing exactly where each image is used. This is incredibly helpful for identifying outdated screenshots (like I mentioned with my own ISC homepage).
WooCommerce Support
ISC fully supports WooCommerce, scanning:
- Product featured images
- Product gallery images
- Product variation images
- Category images
This is crucial for my second-hand shop client. Without WooCommerce support, every product image would be marked as “unused” because it’s not in the post content.
Page Builder Compatibility
ISC works with all major page builders:
- Elementor
- Divi
- Beaver Builder
- WPBakery
- Oxygen
Images used in page builder sections are correctly identified as “used” and won’t appear in the unused images list.
Bonus: Image Source Management
While we’re focused on cleanup in this guide, don’t forget ISC’s original purpose: managing image sources and copyright information. If you need to display photo credits or track image licenses, ISC handles that too. It’s why I built the plugin in the first place.
Ready to clean up your WordPress media library?
Method 3: SQL Queries for Developers
If you‘re comfortable working directly with databases and want maximum control over the process, you can use SQL queries to find unused images in WordPress. This is the method I used for years before building the unused images feature into Image Source Control.
Fair warning: this approach requires specialized technical expertise and carries significant risks. A single mistake in a SQL query can corrupt your database or delete data you need.
When to Use SQL
SQL queries make sense in specific situations:
- You‘re an experienced developer comfortable writing and testing database queries
- You need custom logic that plugins don’t provide (e.g., finding images uploaded between specific dates that aren’t used in custom database tables or fields)
- You’re working on a development/staging site where mistakes won’t affect your live site
- You want to understand exactly what’s happening at the database level
For everyone else, I strongly recommend using Image Source Control instead. It’s safer, faster, and doesn’t require database knowledge.
Basic SQL Query Example
Here’s a basic query to find images that aren’t referenced in post content:
SELECT p1.ID, p1.post_title
FROM wp_posts p1
WHERE p1.post_type = 'attachment'
AND p1.post_mime_type LIKE 'image%'
AND NOT EXISTS (
    SELECT 1
    FROM wp_posts p2
    WHERE p2.post_status = 'publish'
    AND p2.post_content LIKE CONCAT('%', p1.guid, '%')
);Code language: JavaScript (javascript)
This query:
- Selects all posts where the post type is
attachmentand the MIME type indicates an image - Checks if the image’s GUID (URL) appears in any published post’s content
- Returns images that don’t appear anywhere
Important limitations:
- This only checks post content, not post meta, options, or widgets
- It doesn’t account for page builders, WooCommerce, or custom fields
- It won’t find images referenced by ID instead of URL
- Different WordPress installations might store image references differently
The Reality of SQL Queries
I’ve written dozens of custom SQL queries over the years to find unused images. Here’s what I learned: it’s never just one query.
You need separate queries to check:
- Post content (the query above)
- Post meta fields (for page builders and custom fields)
- The options table (for theme settings and widgets)
- WooCommerce product data
- Custom tables created by plugins
Each query needs careful testing. Each one can return false positives. You need to manually cross-reference the results to find images that are truly not used anywhere.
Before turning it into a plugin feature, I once spent about 4 hours writing and testing SQL queries to find unused images on one of my editorial sites. It worked, but it wasn’t fun. And I had to repeat the process every few months when new unused images accumulated.
That’s why I built the unused images feature into Image Source Control. I got tired of writing the same queries over and over.
Common Mistakes to Avoid
I’ve made plenty of mistakes cleaning up media libraries over the years. Here are the big ones to avoid.
Rushing the WordPress Image Cleanup Process
Many people want to clean media library WordPress files as quickly as possible, but speed often leads to mistakes. Whether you’re trying to clean the media library manually or with a plugin, take time to verify before deleting. A methodical approach to how to clean up WordPress media library files prevents accidental deletions and broken images on your live site.
Personally, I plan this task and block a time slot in my calendar ahead.
Deleting Unattached Images Without Verification
The “Uploaded to“ column in WordPress’s Media Library is misleading. Just because an image shows as “unattached” doesn’t mean it’s unused.
Images used in widgets, theme settings, page builders, or as site icons often appear as unattached even though they’re actively displayed on your site. Delete them, and you’ll break things.
I wrote a detailed guide on how to safely delete unattached media in WordPress that explains this distinction. The short version: never assume unattached equals unused.
Not Backing Up Before Cleanup
This should be obvious, but I’ll say it anyway: always back up your site before deleting images in bulk.
Even with careful verification, mistakes happen. A backup means you can restore deleted images if something goes wrong. I recommend testing your cleanup process on a staging site first if you’re deleting hundreds of images at once.
Ignoring Page Builder Images
Most media cleanup plugins only scan post content. They completely miss images stored by Elementor, Divi, Beaver Builder, and other page builders.
These plugins store images in post meta fields with complex data structures. A simple content scan won’t find them. That’s why so many people accidentally delete page builder images and wonder why their layouts break.
Image Source Control’s Database Scan solves this by scanning post meta and options tables, not just post content. It’s the difference between “probably unused” and “definitely unused.”
Conclusion
A cluttered WordPress media library isn’t just an organizational problem. It costs you storage space, slows down backups, makes finding images frustrating, and wastes server resources.
The good news? You don’t need to live with thousands of unused images taking up space on your server. This guide showed you exactly how to clean up WordPress media library files using three different methods, each suited to different skill levels and site requirements.
Here’s what we covered:
- Manual cleanup works for very small sites when you need to clean up WordPress media library files without plugins, but it’s time-consuming and error-prone. The “Uploaded to” column is misleading, and you’ll miss images stored in page builders, widgets, and theme settings.
- Image Source Control offers a reliable, automated solution. The Content Scan scans your entire site, and Database Scan verifies that images are truly unused by searching your entire database—including post meta, options, and WooCommerce data.
- SQL queries give you maximum control but require technical expertise and come with significant risks. They’re best reserved for developers working on staging sites.
My recommendation? Start with Image Source Control. It’s the method I use on all my sites, including the ISC homepage itself. The Scanner goes through the content and the database and you can safely delete unused images in bulk without breaking your site.
Once you’ve cleaned up your media library, establish preventive measures: optimize images before upload, set clear standards for your team, and schedule quarterly maintenance checks. A little prevention goes a long way.
Ready to reclaim your storage space and simplify your media library?
FAQ
How often should I clean my media library?
I recommend a quarterly review for most sites. Every three months, run the Scanner, check for unused images, and delete what you don’t need.
If you’re actively deleting posts, changing themes, or updating product catalogs, you might want to check more frequently – maybe monthly or after major content changes.
The key is consistency. Regular small cleanups are easier than tackling years of accumulated clutter all at once.
Does Image Source Control work with page builders?
Yes. Image Source Control’s Content Scan finds all images used in the frontend. The Database Scan also scans post meta fields where page builders like Elementor, Divi, Beaver Builder, and WPBakery store image data.
This is crucial because most other cleanup plugins only scan post content and completely miss page builder images. That’s why people accidentally delete images and wonder why their layouts break.
What’s the best way to clean up WordPress media library files?
The best way to clean up WordPress media library depends on your site’s complexity. For small sites with under 100 images, manual WordPress cleanup media library methods work fine. For larger sites, especially those using page builders or WooCommerce, use a plugin like Image Source Control that performs deep database scans. This ensures you clean media library WordPress files safely without accidentally deleting images still in use.

Questions? Feedback? How can I help?
Reach out directly via the contact form.